
John Hughes takes us through the DIY installation of the plug and play Elecbrakes EB2 brake controller which is managed via a smart phone app.
Caravans have their own brakes to help slow the rig down so the tow vehicle doesn’t have to do all of the braking. This is usually achieved by fitting an aftermarket device known as a brake controller into the tow vehicle. The brake controller sends a signal to the caravan brakes when you put your foot on the brake in the car. You can also operate the caravan brakes independently of the car by pressing an override button.
These conventional brake controllers are great but just like everything in life they have their little downsides:
- The brake controller is hardwired to the tow vehicle and can’t be easily moved to another car to perform towing duties
- As they are hardwired this is a job usually performed by an auto electrician — i.e., not DIY.
Various companies provide portable brake controllers that can be moved from car to car enabling cars without hardwired brake controllers to tow a caravan. An innovative product known as Elecbrakes EB2 has an alternative solution where the brake controller is mounted to the caravan and managed through a phone app (Apple or Android) or optional remote. The system is plug-and-play and intended for DIY installation which we run through in this story. For brevity we have not pictured every step in the phone app set up.
The instructions call for the unit to be screwed to the A-frame. This is all fine if you only want the device to work with one caravan. However, our install includes a simple hack creating a basic mounting plate that enables the controller to be moved from one van to another. (Note — the system may need to be recalibrated if it is moved to another van, which is easy to do.) In classic DIY tradition, the mounting plate is knocked together with bits and pieces I had lying around in the shed. Alternative materials could be used to create a similar result.

Preparation
You will need to order a suitable adaptor to match your car and caravan trailer connections to enable installation. A phone cradle will also make it easier for initial set up and to view system status while in use.
Next you will need to choose a location to mount the unit on the A-frame which does not interfere with the operation of other devices such as the jockey wheel or obscure information plates affixed to the A-frame. The unit must be mounted parallel to the ground but can be oriented in any position, such as along the top, inside, outside or the bottom of the A-frame. I would suggest under the A-frame would be the last choice due to vulnerability to stone damage or striking the ground. In this instance, we mounted the unit upside down to enable the connection to be pointing in the right direction.
Mount the brake controller
 STEP 1a: Screw the unit to the A-frame with the self-tapping screws provided STEP 1a: Screw the unit to the A-frame with the self-tapping screws provided |
 STEP 1b: Or mount the unit to the A-frame using a simple DIY fabricated mounting plate STEP 1b: Or mount the unit to the A-frame using a simple DIY fabricated mounting plate |
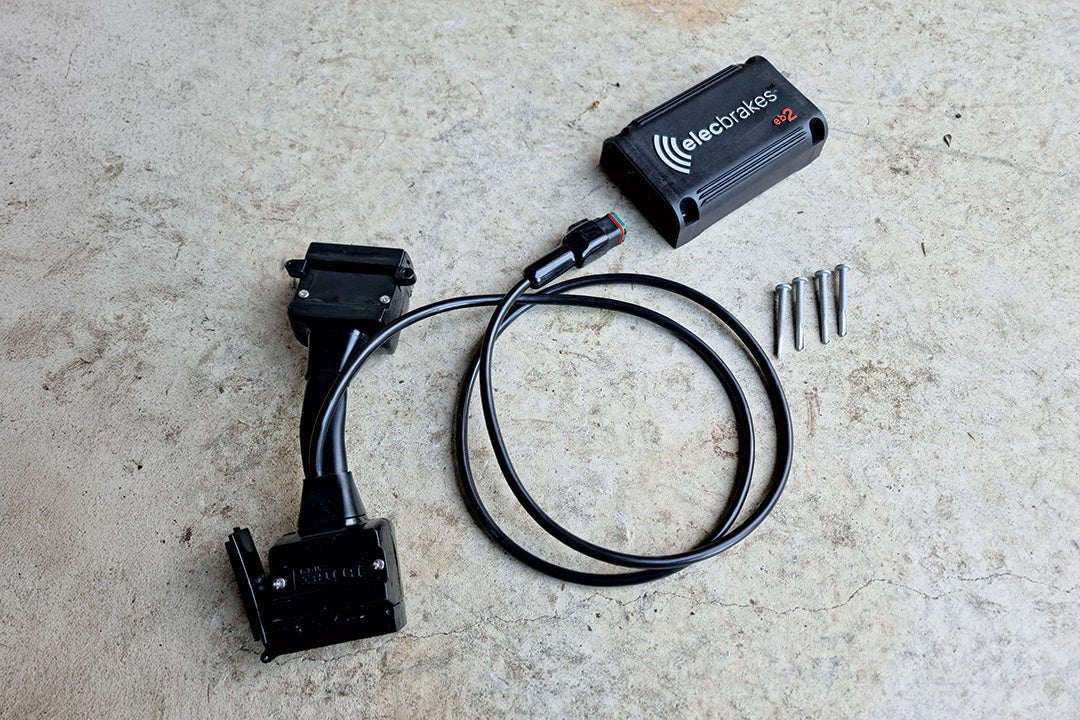
 STEP 2: The supplied adaptor cord has three connection points. Connect the Deutsch plug into the socket on the brake controller unit STEP 2: The supplied adaptor cord has three connection points. Connect the Deutsch plug into the socket on the brake controller unit |
 STEP 3: Connect the caravan trailer plug to the trailer socket on the adaptor STEP 3: Connect the caravan trailer plug to the trailer socket on the adaptor |
 STEP 4: Connect the trailer plug on the adaptor to the trailer socket mounted on the tow vehicle STEP 4: Connect the trailer plug on the adaptor to the trailer socket mounted on the tow vehicle |
Connect the brake controller to the phone app
 STEP 1: Turn the car lights and keep them on while using the brake controller — this activates power to the unit STEP 1: Turn the car lights and keep them on while using the brake controller — this activates power to the unit |
 STEP 2: Tap your phone on the unit to find the Elecbrakes app (you can also search online for it) STEP 2: Tap your phone on the unit to find the Elecbrakes app (you can also search online for it) |
 STEP 3: Download and open the Elecbrakes app STEP 3: Download and open the Elecbrakes app |
 STEP 4: Allow Bluetooth connection STEP 4: Allow Bluetooth connection |
 STEP 5: Find your device STEP 5: Find your device |
 STEP 6: The app will confirm your device STEP 6: The app will confirm your device |
 STEP 7: You will be prompted to put your foot on the brake — check if the van brake lights come on STEP 7: You will be prompted to put your foot on the brake — check if the van brake lights come on |
 STEP 8: You will be prompted to mount your phone in a cradle STEP 8: You will be prompted to mount your phone in a cradle |
Brake configuration and set up
 STEP 1: You will be prompted to configure brake responses STEP 1: You will be prompted to configure brake responses |
 STEP 2: Follow prompt to drive at walking speed, then set braking force by scrolling the numbers STEP 2: Follow prompt to drive at walking speed, then set braking force by scrolling the numbers |
 STEP 3: Follow prompt to drive at 40km/h, then set a braking force by scrolling through the numbers STEP 3: Follow prompt to drive at 40km/h, then set a braking force by scrolling through the numbers |
 STEP 4: Follow prompt to reverse, then set a braking force by scrolling through the numbers STEP 4: Follow prompt to reverse, then set a braking force by scrolling through the numbers |
 STEP 5: Follow prompt to set the override braking force by scrolling through the numbers STEP 5: Follow prompt to set the override braking force by scrolling through the numbers |
 STEP 6: You will be advised brake configuration is completed STEP 6: You will be advised brake configuration is completed |
 STEP 7: You will be asked if you will be using optional Elecbrakes remote (alternative to operating with phone) STEP 7: You will be asked if you will be using optional Elecbrakes remote (alternative to operating with phone) |
 STEP 8: You will be advised the setup is complete and ready to go STEP 8: You will be advised the setup is complete and ready to go |
Operation
 STEP 1: When brakes are not activated a tick will appear on the screen. Pressing the tick will apply the override brakes STEP 1: When brakes are not activated a tick will appear on the screen. Pressing the tick will apply the override brakes |
 STEP 2: When you put your foot on the brake the app will show ‘BRAKING’ STEP 2: When you put your foot on the brake the app will show ‘BRAKING’ |
 STEP 3: The app has a number of ‘programs’ which enable you to have various pre-set braking calibrations for different applications STEP 3: The app has a number of ‘programs’ which enable you to have various pre-set braking calibrations for different applications |
 STEP 4: Settings can be selected to monitor the status of the system STEP 4: Settings can be selected to monitor the status of the system |
 STEP 5: Elecbrakes can also be operated through Apple CarPlay or Android Auto STEP 5: Elecbrakes can also be operated through Apple CarPlay or Android Auto |
 STEP 6: This is how it appears on the screen STEP 6: This is how it appears on the screen |
Thoughts on the Elecbrakes EB2 controller
Offering an alternative to a permanently installed brake controller is a winner for some users. The unit is easy to install and configure. Most importantly, the van brakes worked well, providing status feedback through the phone app without any issues during our brief testing. Technically you don’t need to have the app open for the Elecbrakes EB2 to work, but you do need it open to operate the important safety feature override switch. Alternatively, it can be controlled with an optional remote.
It’s great that you can choose to display the app directly on the phone or Apple CarPlay/Android Auto. This gives you options to display other applications in addition to the Elecbrake app. There is also the issue of the legality of touching the phone while driving. Operating the system through Apple CarPlay/Android Auto solves that problem. If you don’t like the idea of Apple CarPlay/Android Auto being used to display the app, then the optional remote is worth considering.
I think the touchscreen override switch has pros and cons. With practice you can learn to reach for and operate traditional tactile override switches by feel without taking your eyes off the road. I don’t believe this is possible with the screen-based switch on Elecbrakes.
However, the screen-based override switch is very easy to see and arguably easier for unfamiliar operators to activate. When you touch the Elecbrakes screen override switch the brakes stay on until you touch it again to turn them off. Traditional override brakes revert to off when you take your hands off the switch. I can see operators accidentally activating or leaving on the override brake function until they become familiar with the system.
I believe there is merit in developing some form of robust universal mounting system so that the Elecbrakes could be easily moved from one caravan to another. Overall, I think Elecbrakes is a great idea for people needing to use multiple tow vehicles (and with adaptation) multiple trailers/caravans.
If in doubt, consult a professional
Improper maintenance can lead to injury, death or property damage. Maintenance work of this nature should only be undertaken by people with suitable competence. The information provided is general in nature, not comprehensive and should only be taken as a guide. Individual discretion must be exercised and persons undertaking described tasks do so completely at their own risk. Publishers and creators of this content accept no responsibility for loss or damage.
Thanks to Andrew Phillips and the team from the RV Repair Centre, 120 Canterbury Road, Bayswater North Vic 3151, P: 03 9761 4189
THE NEXT STEP
If you want to learn the latest caravan news, find the most innovative new caravans and camping gear or get inspired to plan your next adventure to some of Australia's best getaway destinations, subscribe to our weekly newsletter. We promise to send you only the best content.
Related articles:
DIY: Installing a Black Jack Trailer Jack
DIY: How to replace a caravan handbrake cable


DIY: Installing an Elecbrakes EB2 brake controller