
John Hughes and the team at the RV Repair Centre show us how to install a Black Jack motorised trailer jack.
Manual jockey wheels can challenging to operate for people with limited mobility. Also, some people just like to mechanise and automate things. The Black Jack Trailer Jack is driven by an electric motor powered by your caravan or car battery and replaces a manual jockey wheel. The RV Repair Centre show us in principle how it’s done. Read the installation instructions for more information.
 The Black Jack Trailer Jack kit — a motorised jockey wheel is great for those with limited mobility
How to install a Black Jack Trailer Jack:
 STEP 1: Select a suitable location on the A-frame to mount the Black Jack. In this instance, it was necessary to relocate some existing wires STEP 1: Select a suitable location on the A-frame to mount the Black Jack. In this instance, it was necessary to relocate some existing wires |
 STEP 2: The lead that connects to the tow vehicle was moved out of the way temporarily STEP 2: The lead that connects to the tow vehicle was moved out of the way temporarily |
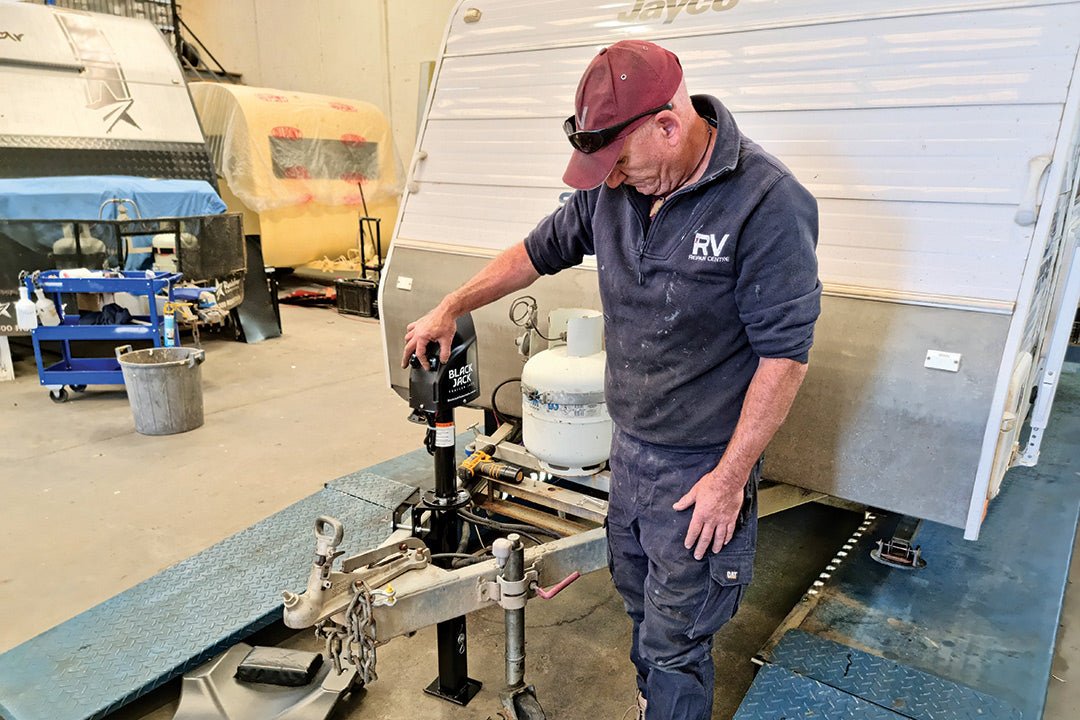
 STEP 3: Hold the Black Jack in position to ensure it will fit in the selected space* STEP 3: Hold the Black Jack in position to ensure it will fit in the selected space* |
 STEP 4: Select a bolt hole on the mounting bracket which will enable the Black Jack to mount at a suitable height STEP 4: Select a bolt hole on the mounting bracket which will enable the Black Jack to mount at a suitable height |
 STEP 5: Insert a supplied bolt (with washer) into the corresponding hole in the mounting plate STEP 5: Insert a supplied bolt (with washer) into the corresponding hole in the mounting plate |
 STEP 6: Align the mounting plate and mounting bracket using the bolt STEP 6: Align the mounting plate and mounting bracket using the bolt |
 STEP 7: Insert a second bolt and washer STEP 7: Insert a second bolt and washer |
 STEP 8: Add lock nuts and washers (finger tight) onto the two top bolts STEP 8: Add lock nuts and washers (finger tight) onto the two top bolts |
 STEP 9: Insert the two lower bolts and washers STEP 9: Insert the two lower bolts and washers |
 STEP 10: Add lock nuts and washers (finger tight) onto the two lower bolts STEP 10: Add lock nuts and washers (finger tight) onto the two lower bolts |
 STEP 11: Tighten all four bolts progressively. Uneven tightening can lead to bending a plate STEP 11: Tighten all four bolts progressively. Uneven tightening can lead to bending a plate |
 STEP 12: The main jack assembly can be oriented to have the housing facing a variety of ways STEP 12: The main jack assembly can be oriented to have the housing facing a variety of ways |
 STEP 13: Remove the cable tie and orient the holes to a suitable position STEP 13: Remove the cable tie and orient the holes to a suitable position |
 STEP 14: Insert the supplied bolts and washers into the jack main body mounting plate STEP 14: Insert the supplied bolts and washers into the jack main body mounting plate |
 STEP 15: Attach the supplied lock nuts and washer finger tight STEP 15: Attach the supplied lock nuts and washer finger tight |
 STEP 16: Tighten the bolts progressively STEP 16: Tighten the bolts progressively |
 STEP 17: Locate the 12V power feed cable wired to the Black Jack body STEP 17: Locate the 12V power feed cable wired to the Black Jack body |
 STEP 18: It has a 50A Anderson plug that can be connected to another Anderson plug with a power source+ STEP 18: It has a 50A Anderson plug that can be connected to another Anderson plug with a power source+ |
 STEP 19: We sheathed the power input with corrugated conduit for additional protection against abrasion STEP 19: We sheathed the power input with corrugated conduit for additional protection against abrasion |
 STEP 20: Route the Black Jack 12V power feed and cable tie into position STEP 20: Route the Black Jack 12V power feed and cable tie into position |
 STEP 21: We re-routed the existing lead that we removed temporarily — refer step three STEP 21: We re-routed the existing lead that we removed temporarily — refer step three |
 STEP 22: We used the Anderson plug extension loom to simulate running back to the house battery STEP 22: We used the Anderson plug extension loom to simulate running back to the house battery |
 STEP 23: Connect the power lead to the Anderson extension lead STEP 23: Connect the power lead to the Anderson extension lead |
 STEP 24: The Anderson extension lead would be connected to the house battery STEP 24: The Anderson extension lead would be connected to the house battery |
 STEP 25: The Black Jack is raised and lowered with the press of a button — test operate it STEP 25: The Black Jack is raised and lowered with the press of a button — test operate it |
 STEP 26: The Black Jack has a light switch — test operate it STEP 26: The Black Jack has a light switch — test operate it |
 STEP 27: The Black Jack has a bubble to assist in setting the van at a level height STEP 27: The Black Jack has a bubble to assist in setting the van at a level height |
 STEP 28: The Black Jack can be manually operated if your power does not work — open the cover STEP 28: The Black Jack can be manually operated if your power does not work — open the cover |
 STEP 29: Use the supplied crank handle to manually raise and lower the Black Jack if required STEP 29: Use the supplied crank handle to manually raise and lower the Black Jack if required |
 STEP 30: The Black Jack standard foot can be adjusted in height or removed by removing the lock pin STEP 30: The Black Jack standard foot can be adjusted in height or removed by removing the lock pin |
 STEP 31: To fit the optional folding foot first remove the standard foot STEP 31: To fit the optional folding foot first remove the standard foot |
 STEP 32: The folding foot is supplied with a washer and space collar STEP 32: The folding foot is supplied with a washer and space collar |
 STEP 33: Slide on the spacer collar first, then the washer onto the Black Jack tube STEP 33: Slide on the spacer collar first, then the washer onto the Black Jack tube |
 STEP 34: Lift the folding leg into position over the Black Jack tube STEP 34: Lift the folding leg into position over the Black Jack tube |
 STEP 35: Insert the supplied pin through the folding foot and Black Jack tube hole STEP 35: Insert the supplied pin through the folding foot and Black Jack tube hole |
 STEP 36: Attach the supplied washer and clip to the pin STEP 36: Attach the supplied washer and clip to the pin |
 STEP 37: The folding foot automatically folds up when the jack is raised STEP 37: The folding foot automatically folds up when the jack is raised |
 STEP 38: The folding foot automatically folds down when the jack is lowered STEP 38: The folding foot automatically folds down when the jack is lowered |
 STEP 39: Black Jack supplies a pad to spread the load on soft ground STEP 39: Black Jack supplies a pad to spread the load on soft ground |
 STEP 40: The manual jockey wheel is no longer required STEP 40: The manual jockey wheel is no longer required |
* The Black Jack Trailer Jack comes packaged with the A-frame mounting brackets cable tied to the main jack assembly. We conducted the installation with the two parts cable tied together because it helped with visualising the jack positioning. If you find this method too heavy to handle, removing the A-frame mounting bracket from the main jack assembly and fitting the A-frame mounting bracket first would make it easier.
+ The Black Jack could connect to the following:
- Anderson plug on the tow vehicle
- Anderson plug on the caravan which normally connects to the tow vehicle — which means it would draw off the house battery. In some instances the carvan charging system will not allow power to come from the battery to the Anderson plug.
- Extension wiring loom provided in this kit which is then connected to the house battery. If the Black Jack is connected to the house battery it may be necessary to route it through a shunt so power consumption can be monitored.
Special thanks to Black Jack Trailer Jacks for assistance with this story.
If in doubt, consult a professional
Improper maintenance can lead to injury, death or property damage. Maintenance work of this nature should only be undertaken by people with suitable competence. The information provided is general in nature, not comprehensive and should only be taken as a guide. Individual discretion must be exercised and persons undertaking described tasks do so completely at their own risk. Publishers and creators of this content accept no responsibility for loss or damage.
Thanks to Andrew Phillips and the team from the RV Repair Centre, 120 Canterbury Road, Bayswater North Vic 3151, P: 03 9761 4189
THE NEXT STEP
If you want to learn the latest caravan news, find the most innovative new caravans and camping gear or get inspired to plan your next adventure to some of Australia's best getaway destinations, subscribe to our weekly newsletter. We promise to send you only the best content.
Related articles:
DIY: Basic wheel alignment checks for single-axle caravans
DIY: How to replace a caravan handbrake cable


DIY: Installing a Black Jack Trailer Jack