
In preparation for a trip along the iconic Gibb River Road in the Kimberley — where dump points are few and far between — Caravan World’s Allison Watt and partner Ray installed a Cuddy composting toilet in their van.
One of the most abhorred chores of caravanning life is the emptying of the cassette from the toilet — the queues at dump points, the splashing, the smell — yuck.
Admittedly, I’ve never done it. It’s not in my position description of caravan tasks so my other half has always taken on this most despised of jobs.
We’d been toying with the idea of installing a compost toilet in our Crusader for some time, so when we decided to head off to drive the iconic Gibb River Road in WA and maximise our opportunities to free camp off-grid, the decision was a no-brainer.
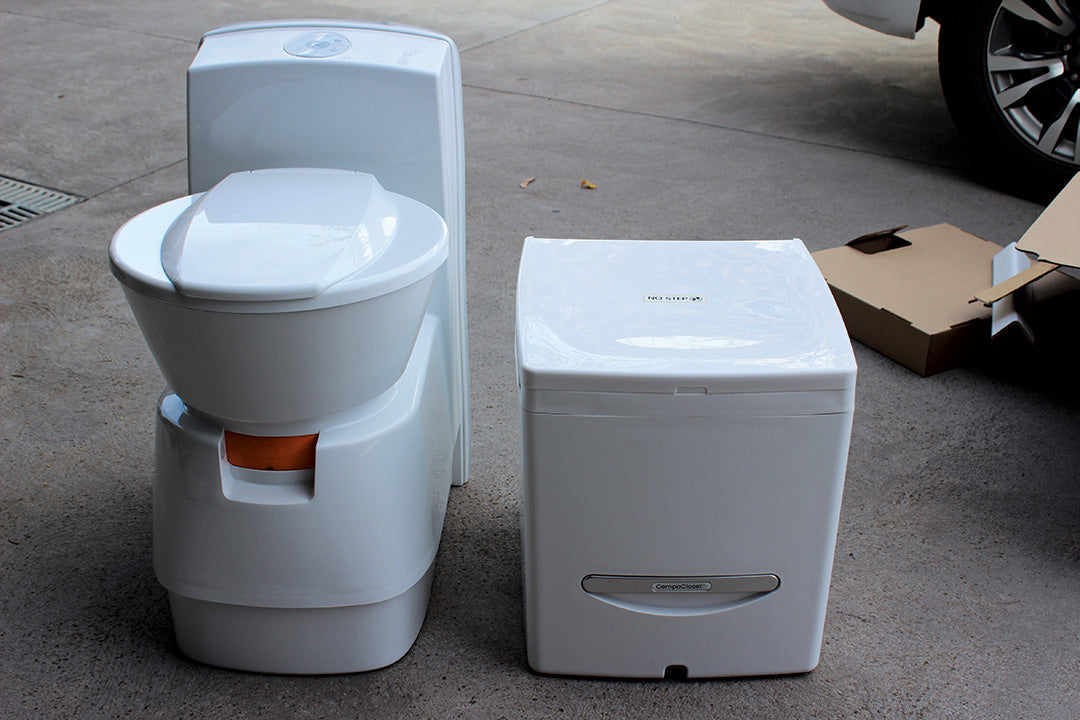
There are several brands on the market in Australia including Nature’s Head and OGO. We opted for the Cuddy because of its compact size (41.4cm high x 38.4cm wide x 42.7cm deep), light weight (9.5kg) and competitive price ($1495).
Cuddy is made in the US and Michael Hann is the exclusive distributor and agent for Compo Closet in Australia and New Zealand.
How does it work?
Like all composting toilets, Cuddy works by separating liquids and solids. The Cuddy has two removeable containers within the unit. A special bowl design channels the liquids into a smell-proof container (6.5L capacity) at the front of the unit, while solids go into a separate container (14.7L capacity) at the back.
Before using the Cuddy, you must add a compost medium such as hydrated coco coir (available from Bunnings and the like), mini hemp or wood shavings to the solids bin just covering the bottom of the agitator arms which are used to incorporate the waste into the compost material, triggering the decomposition process. This composting waste is stored in its container and sealed underneath the bowl.
The crank handle for the agitator is easy to access at the front. The liquids container has an indicator light to let you know when it’s full. Each container is easy to remove and carry with side, front and back handles.
Solids from composting toilets can be put in a biodegradable bag and disposed of in a regular rubbish bin or buried responsibly. Depending on how many people are using it, the solids container should only need to be emptied every two to four weeks. Liquids can be poured down a regular toilet or onto the nearest thirsty-looking mature tree — but make sure you are well away from fellow campers.
There are differing opinions about whether toilet paper should be used in composting toilets. Cuddy recommends keeping loo paper separate from the compost mix as it takes longer to break down and can fill up the solids bin more quickly. While any toilet paper will eventually break down, recycled single ply toilet paper seems to breakdown more quickly.
To keep paper out of the loo, just put it in a separate bin lined with a scented nappy bag or similar and dispose of it with your general rubbish — it’s really no different to putting a baby’s nappy in the bin.
As there’s no water to ‘flush’ the bowl, a quick couple of squirts with a spray bottle with five parts water to one part vinegar keeps it fresh.
Keeping ones and twos separate does require some behaviour change. Menfolk are encouraged to sit to pee to ensure a more accurate aim into the small hole into the liquid container and to eliminate the inevitable ‘splashing’ which often occurs from great heights. And the ladies might have to adjust their seated position slightly too.
Do composting toilets smell?
When used properly, composting toilets do not smell. The composted material looks and smells earthy — like a forest floor.
We opted to vent our Cuddy externally so the small 12V fan expels any smells and moisture and it works a treat. While we opted to secure our loo permanently in our van (there are reinforced points in the base for doing this), Cuddy compositing toilets are designed to be portable and flexible for all types of uses. So, if you are using it for weekends or shorter trips, using the internal charcoal filter and fan will be fine.
The Cuddy is priced at $1495 and has a 24-month warranty when purchased direct from a Cuddy agent. A range of accessories such as a travel bag, bamboo lid and a ‘shower cap’ for combination bathrooms is also available.
It’s available on the Compo Closet website.
Composting toilet pros and cons
Pros
- Eco-friendly: They don’t use water or chemicals.
- No smell: Composting toilets should not smell as the liquid and solid waste are separated.
- Saves space: Cuddy is significantly smaller than a regular cassette toilet and is portable if you don’t want to install it permanently in your van.
- Off-grid friendly: No need for 240V power or water and no need to seek out a dump point.
Cons
- Learning curve: Most composting toilets do come with a slight learning curve. Variables like how many people are using it, the weather conditions where you are located, and waste disposal options are all things that can be different for people depending on their specific circumstances.
- Moisture management: As the process starts working, the solid waste may start producing moisture. If you live or travel somewhere very warm and humid, this might affect you more than others.
- May need a power source: Although Cuddy is designed not to need a power source it is recommended to wire in the internal fan to help with airflow. This will help reduce moisture buildup and encourage the beginning of the composting process.
- Cost: They’re not cheap but you are not buying chemicals, are saving water and not seeking out dump points.
Installation steps
|
STEP 1 — Opening the box
|
 STEP 2 — The Cuddy is a compact 41cm high STEP 2 — The Cuddy is a compact 41cm high |
 STEP 3 — Shorter than a conventional cassette toilet STEP 3 — Shorter than a conventional cassette toilet |
 STEP 4 — Disconnect the water supply from the cassette toilet STEP 4 — Disconnect the water supply from the cassette toilet |
 STEP 5 — Remove the overflow pipe STEP 5 — Remove the overflow pipe |
 STEP 6 — Unclip the cassette rails and remove the screws in floor STEP 6 — Unclip the cassette rails and remove the screws in floor |
 STEP 7 — Lift and remove the toilet from inside STEP 7 — Lift and remove the toilet from inside |
 STEP 8 — The toilet is still attached to the 12V power supply STEP 8 — The toilet is still attached to the 12V power supply |
 STEP 9 — Disconnect the 12V power supply STEP 9 — Disconnect the 12V power supply |
 STEP 10 — Unscrew the flush unit bracket from the wall STEP 10 — Unscrew the flush unit bracket from the wall |

STEP 11 — Clean the floor and surrounds ready for new toilet
|
 STEP 12 — Remove the solid and liquid canisters from Cuddy STEP 12 — Remove the solid and liquid canisters from Cuddy |
 STEP 13 — Turn the filter base over to vent the 12V fan to outside STEP 13 — Turn the filter base over to vent the 12V fan to outside |
 STEP 14 — Fit vent hose to bottom of unit STEP 14 — Fit vent hose to bottom of unit |
 STEP 15 — Slide vent hose through existing hole in floor STEP 15 — Slide vent hose through existing hole in floor |
 STEP 16 — Connect 9V battery for liquids container indicator light STEP 16 — Connect 9V battery for liquids container indicator light |
 STEP 17 — Install the on/off switch for 12V fan to existing cable STEP 17 — Install the on/off switch for 12V fan to existing cable |
 STEP 18 — Place unit in position and screw to floor via reinforced points in the base STEP 18 — Place unit in position and screw to floor via reinforced points in the base |
 STEP 19 — Reinsert the containers — add compost medium to the solids container as per the instructions before use STEP 19 — Reinsert the containers — add compost medium to the solids container as per the instructions before use |
 STEP 20 — Toilet is ready for use STEP 20 — Toilet is ready for use |
 STEP 21 — The Cuddy comes with eyes stickers if you want the front of your Cuddy to have a smiley face (the mouth is the agitator crank at the front) STEP 21 — The Cuddy comes with eyes stickers if you want the front of your Cuddy to have a smiley face (the mouth is the agitator crank at the front) |

If in doubt, consult a professional
Improper maintenance can lead to injury, death or property damage. Maintenance work of this nature should only be undertaken by people with suitable competence. The information provided is general in nature, not comprehensive and should only be taken as a guide. Individual discretion must be exercised and persons undertaking described tasks do so completely at their own risk. Publishers and creators of this content accept no responsibility for loss or damage.
THE NEXT STEP
If you want to learn the latest caravan news, find the most innovative new caravans and camping gear or get inspired to plan your next adventure to some of Australia's best getaway destinations, subscribe to our weekly newsletter. We promise to send you only the best content.
Related articles:
A guide to RV cassette and composting toilets
DIY: How to replace your caravan brakes


DIY: Installing a Cuddy composting toilet in your van