
Your trailer plug is a part that often needs replacing. They can fail from old age or get damaged from falling out of the car connection and being dragged down the road. Replacing the trailer plug is a fairly simple and inexpensive task and the RV Repair Centre steps us through it.
Starting with the basics, the connector attached to your caravan has male pins and is referred to as the trailer plug. The connector attached to your car has matching female sockets and is referred to as the trailer socket.
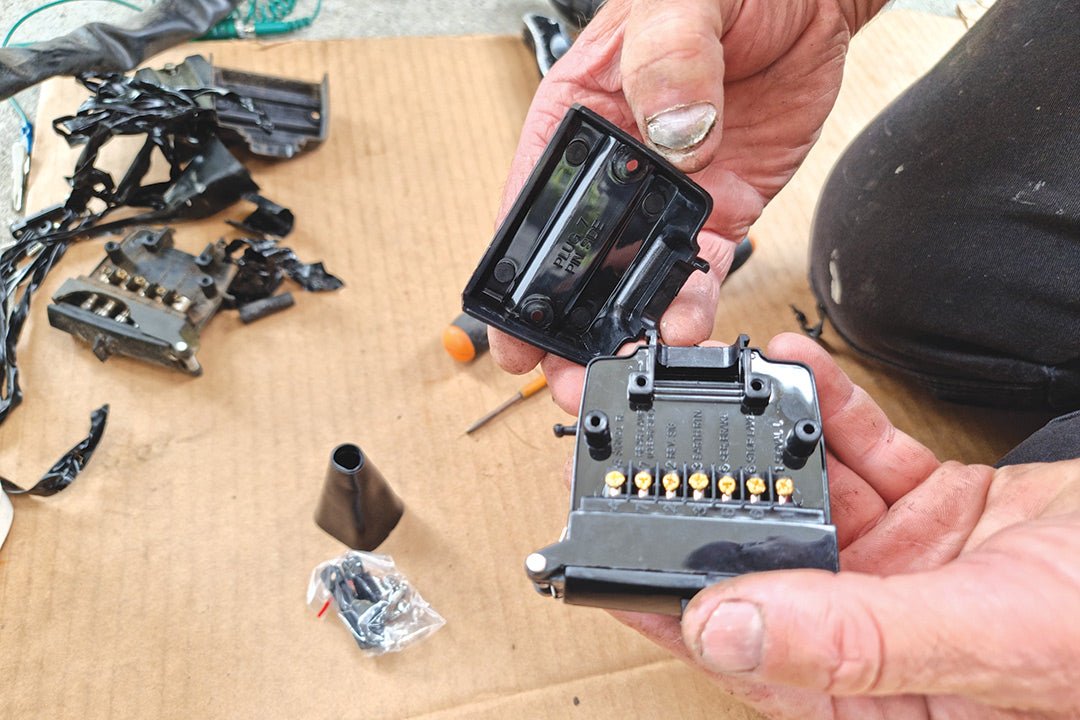
In this instance, we are replacing a 12-pin plug. The trailer plug is made up of two rows of pins. One of the rows has seven smaller pins which are used for the van lighting and trailer brakes. The second row has five larger pins used to power accessories in the van.
The trailer light/brake wires follow a convention of colours and positioning in the seven-pin plug/connector row. It is important to follow a plug wiring diagram to position the wires correctly as seen here. Be careful not to get confused with the plug wiring diagram and the pin wiring diagram as they are the inverse of each other. The five-pin plug/connector (accessories) does not follow a convention as it will vary from installation to installation. Therefore, there is not a diagram for the five-pin row. After removing the covers, it is a good idea to take photos of the wiring on both rows to refer back to when reinstalling the wires.

Replacing a trailer plug:
 STEP 1 The trailer plug is damaged and needs to be replaced STEP 1 The trailer plug is damaged and needs to be replaced |
 STEP 2 Remove the electrical tape STEP 2 Remove the electrical tape |
 STEP 3 Expose the rubber cover STEP 3 Expose the rubber cover |
 STEP 4 Cut the rubber boot and remove it STEP 4 Cut the rubber boot and remove it |
 STEP 5 Remove the screws retaining the five-pin plastic cover STEP 5 Remove the screws retaining the five-pin plastic cover |
 STEP 6 Remove the five-pin plastic cover STEP 6 Remove the five-pin plastic cover |
 STEP 7 You will see there is a clamp holding the wires in place STEP 7 You will see there is a clamp holding the wires in place |
 STEP 8 Remove the screws and remove the clamp holding the wires in place STEP 8 Remove the screws and remove the clamp holding the wires in place |
 STEP 9 Loosen the terminal screws and remove the wires (in this instance one wire has detached) STEP 9 Loosen the terminal screws and remove the wires (in this instance one wire has detached) |
 STEP 10 Remove the seven-pin plastic cover STEP 10 Remove the seven-pin plastic cover |
 STEP 11 There is a clamp holding the seven wires in place STEP 11 There is a clamp holding the seven wires in place |
 STEP 12 Remove the screws holding the clamp in place STEP 12 Remove the screws holding the clamp in place |
 STEP 13 Remove the clamp holding the seven wires in place STEP 13 Remove the clamp holding the seven wires in place |
 STEP 14 Loosen the terminal screws retaining the terminated wires STEP 14 Loosen the terminal screws retaining the terminated wires |
 STEP 15 Remove the seven wires STEP 15 Remove the seven wires |
 STEP 16 Source a new trailer plug (note, fasteners may be inside the rubber cover) STEP 16 Source a new trailer plug (note, fasteners may be inside the rubber cover) |
 STEP 17 Trim the rubber boot to make the opening wide enough to accept the bundle of wires STEP 17 Trim the rubber boot to make the opening wide enough to accept the bundle of wires |
 STEP 18 Check that the wires will fit through the rubber boot and trim more if necessary STEP 18 Check that the wires will fit through the rubber boot and trim more if necessary |
 STEP 19 Feed the wires through the rubber boot STEP 19 Feed the wires through the rubber boot |
 STEP 20 Slide the rubber boot down the bundle of wires out of the way STEP 20 Slide the rubber boot down the bundle of wires out of the way |
 STEP 21 Disentangle wires if necessary STEP 21 Disentangle wires if necessary |
 STEP 22 Remove the seven-pin plastic cover STEP 22 Remove the seven-pin plastic cover |
 STEP 23 Loosen the terminal screws to make the openings large enough to accept the wire STEP 23 Loosen the terminal screws to make the openings large enough to accept the wire |
 STEP 24 Twist the exposed copper wire so that it will fit in the terminal holes STEP 24 Twist the exposed copper wire so that it will fit in the terminal holes |
 STEP 25 Insert the wires into the terminal starting with the white wire in the middle STEP 25 Insert the wires into the terminal starting with the white wire in the middle |
 STEP 26 Tighten the terminal screws being careful not to overtighten which can damage wire strands STEP 26 Tighten the terminal screws being careful not to overtighten which can damage wire strands |
 STEP 27 Connect all seven wires STEP 27 Connect all seven wires |
 STEP 28 Gather all seven wires to fit in the plug entry point STEP 28 Gather all seven wires to fit in the plug entry point |
 STEP 29 The clamp can be oriented with the opening up or down to accommodate smaller or larger wires. Here the opening is up to suit smaller wires STEP 29 The clamp can be oriented with the opening up or down to accommodate smaller or larger wires. Here the opening is up to suit smaller wires |
 STEP 30 Use the screws supplied to fasten the clamp STEP 30 Use the screws supplied to fasten the clamp |
 STEP 31 Loosen the terminal screws to make the openings large enough to accept the wire STEP 31 Loosen the terminal screws to make the openings large enough to accept the wire |
 STEP 32 Insert the wire connectors into the terminals and tighten the screws STEP 32 Insert the wire connectors into the terminals and tighten the screws |
 STEP 33 Position the clamp, this time with the opening is down to accommodate the larger wires STEP 33 Position the clamp, this time with the opening is down to accommodate the larger wires |
 STEP 34 Use the screws supplied to fasten the clamp STEP 34 Use the screws supplied to fasten the clamp |
 STEP 35 Double check the wires are installed correctly as per the wiring diagram and that no wires have come out STEP 35 Double check the wires are installed correctly as per the wiring diagram and that no wires have come out |
 STEP 36 Note there is a five-pin plug cover and seven-pin plug cover STEP 36 Note there is a five-pin plug cover and seven-pin plug cover |
 STEP 37 Put the five-pin cover in place STEP 37 Put the five-pin cover in place |
 STEP 38 Use the screws supplied to fasten the five-pin cover STEP 38 Use the screws supplied to fasten the five-pin cover |
 STEP 39 Put the seven-pin cover in place STEP 39 Put the seven-pin cover in place |
 STEP 40 Use the screws supplied to fasten the seven-pin cover STEP 40 Use the screws supplied to fasten the seven-pin cover |
 STEP 41 Secure the bundle of wires in a neat loom using electrical tape STEP 41 Secure the bundle of wires in a neat loom using electrical tape |
 STEP 42 Slide the rubber boot up over the loom STEP 42 Slide the rubber boot up over the loom |
 STEP 43 Push the rubber boot up to the trailer connector wire opening STEP 43 Push the rubber boot up to the trailer connector wire opening |
 STEP 44 Start wrapping electrical tape over the rubber boot STEP 44 Start wrapping electrical tape over the rubber boot |
 STEP 45 Continue winding the electrical tape until it covers the wire sheathing STEP 45 Continue winding the electrical tape until it covers the wire sheathing |
If in doubt, consult a professional
Improper maintenance can lead to injury, death or property damage. Maintenance work of this nature should only be undertaken by people with suitable competence. The information provided is general in nature, not comprehensive and should only be taken as a guide. Individual discretion must be exercised and persons undertaking described tasks do so completely at their own risk. Publishers and creators of this content accept no responsibility for loss or damage.
Thanks to Andrew Phillips and the team from the RV Repair Centre, 120 Canterbury Road, Bayswater North Vic 3151, P: 03 9761 4189.
THE NEXT STEP
If you want to learn the latest caravan news, find the most innovative new caravans and camping gear or get inspired to plan your next adventure to some of Australia's best getaway destinations, subscribe to our weekly newsletter. We promise to send you only the best content.
Related Articles:


DIY: How to replace a trailer plug