
Operation 200 Part 3: Ironman 4x4, Redarc and UNIDEN

As we continued the upgrade of our 200 Series LandCruiser, plans for our trip to WA with the van were firming up, and the departure date loomed closer. We still needed to add some essential equipment, and the next priorities were a bullbar, a rack, a house battery and a radio.
No bull
In the past, adding a bullbar was one of the first additions to any offroader's arsenal of options. They have become a sign of hard road travel for any wanna-be outback traveller. Lately, though, they are more of a considered accessory as we explore weight and safety issues. Rather than just installing a bar as a matter of course, owners need to consider how, when and where they intend to travel as well as checking their vehicle's weight capacity. Let's review these as a background as to why we chose an Ironman 4x4 Premium bar for our 200 Series upgrade.
Adding weight to any vehicle, especially one used for towing a big van, isn't as straightforward as it might be. Most cars have a limited payload, and once you add accessories and a van onto the towball, it’s easy to exceed the legal and safe limit the manufacturer specifies. If you have been following our Operation 200 upgrades, you will know that we started our journey with a stock GX LandCruiser by installing a Tough Dog gross vehicle mass upgrade. This gave us a payload close to a tonne and plenty of scope for adding accessories and cargo.
With decades of offroad vehicle ownership behind me, I’m both a creature of habit and a realist. My last 10 or so vehicles through Land Rovers, HiLuxes, Navaras, Prados and a collection of 100 Series have all had bullbars. Have I ever hit a bull? No, but I have seen enough close calls to confirm a protection bar is a must if you plan to travel at night, which we often do. No set rule exists for those who avoid nighttime travel in the bush. Still, you risk damage to the all-important radiator if you hit any animal at speed, and that is the difference between being towed home or making it under your own steam. Factor that in if you're a day's drive from help.
And a bar is very cool looking, which adds to the appeal, but other benefits of fitting a bar are that it gives you somewhere to mount a set of lights and a radio aerial.
Ironman 4x4's range of bullbars for most 4WD vehicles includes an alloy bar and the currently popular Proguard without upper loops. We chose a steel Premium deluxe bar for the added protection of the radiator with 60.3mm tubular steel triple loops. It gave us the benefit of LED fog lights that were missing on our GX version and the option of mounting a winch down the track. The bar has high lift jack points and provision for two 9in driving lights, a light bar and two slotted mounts for quick fit and removal of radio aerials.
A lot of work goes into the pleasing aesthetics of the bars and making them Australian Design Rules (ADR) compliant. Hence, they are Supplemental Restraint System (SRS) airbag compatible and have provisions for parking sensors and forward-facing cameras where fitted. Each bar has a unique Ironman 4x4 chassis cradle that easily holds a 12,00lb winch and cuts down on overall weight.

All Ironman 4x4 bullbars are designed within the strict guidelines of all Vehicle Standards Information (VSI) guidelines and comply with Australian Standards and Australian Design Rules.
Ironman 4x4 develops each bar from scratch across different customer expectations using 3D scanning and computer modelling in Finite Element Analysis to ensure correct fit and sturdy engineering. They are independently tested and certified for SRS compatibility.
The bar is built in Thailand from hot-rolled commercial-quality SPHC pickled steel that delivers superior weldability, maximum strength and corrosion resistance. Components are laser formed, welded for accurate fit and finished in durable powder coat paint.

Fitting the bar
When I looked into it, plenty of owners have gone down the DIY path of fitting the bar. I thought about it, but given our time constraints and my elementary workshop, I decided to recruit the Ironman 4x4 dealer — South Coast 4x4 in Bega — to complete the task and when I saw what's involved, I'm glad I did.

Even with the South Coast 4x4's know-how, proper equipment and effective workflow, the installation took around 10 hours. If I had done it, I'd still be in the garage instead of halfway across Australia as I write. But it's horses for courses and comprehensive instructions mean you can save workshop dollars if you are confident. After all, 10 hours of mechanical time isn't insignificant at today's rate. As part of the fitout, we included two rated tow hitches to replace the standard tiedown points to ensure we had a safe place for recovery if we got into strife.
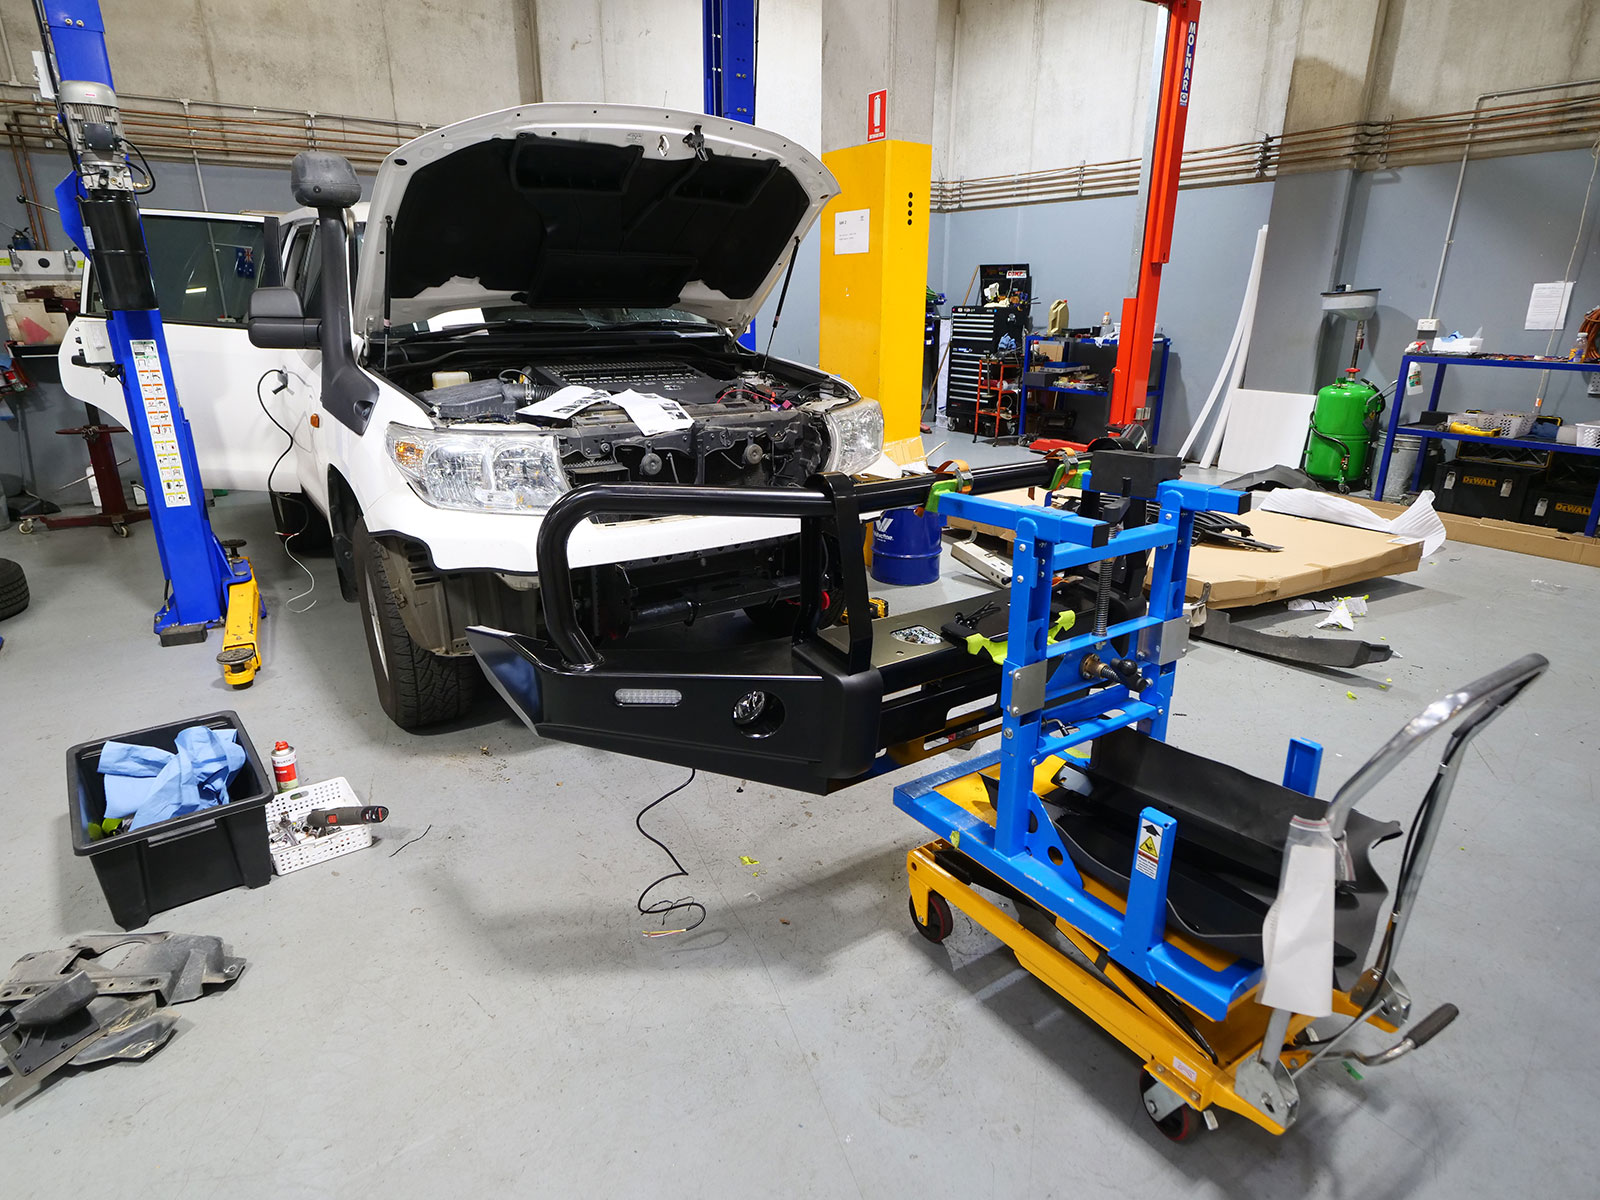 The bullbar has performed without any undue shake or vibration on the road. There was no noticeable difference in how the 200 steered or behaved across the legal speed range. We fitted Narva LED driving lights, and they stay put on even the worst corrugations.
The price of the Premium Ironman 4x4 bullbar for the 200 is $2478.

Up on the roof
While the 200 was in the workshop, we took the opportunity to let South Coast 4x4 loose on bolting on an Ironman 4x4's Atlas roof rack. Having extra storage and carrying space would be necessary on our trip. It allowed us to move around equipment as needed and allowed simple things like collecting firewood along the track.

The Atlas rack is a stylish, modern design with loads of versatility, and it's built sturdy from high-grade metal components. Clever design means the Atlas rack is a system to handle a variety of specialised equipment and toys. The flat design of the platform meant we could easily fit kayaks and fishing equipment for more local trips.
The full-length 1240mm x 2130mm platform is made from extruded aluminium beams surrounded by an extruded aluminium perimeter. The beams run side to side, making for more effortless loading and securing of cargo with less opportunity for longer items to drop down and hit your roof.

Mounting blades fitted into the three standard rack mounting points on each side of the roof. The blades are fabricated from corrosion-resistant stainless steel for strength and cleverly incorporate mounting holes for lights, cabling and so on. The platform bolts onto alloy crossbars fixed to the blades, and the platform includes handy accessory mounting channels for easy mounting of virtually anything. Special brackets accommodate awnings, shovel holders, jerry cans, jacks, spare wheels and light bars. We decided to keep it simple with a few tiedown eyes that slot into the platform channels and screw on tight.


Once fitted, the low-profile rack and textured black powder-coated finish integrated well into the look of the 200. Ironman 4x4 makes no secret of the extra wind noise the rack creates, and yes, over 80km, you can hear it, especially in a crosswind and even with deflectors built into the leading edge of the rack. Toyota rates the 200's roof rack load at 200kg, so with a rack weight of 36 kilograms, there's a healthy 166kg capacity, which Ironman 4x4 specifies across all terrain, unlike other suppliers. Fitting time was just under two hours.
The full-length platform rack with mounting kit and blades retails for $2005.

The Power of Redarc
At Caravan World, we greatly respect the various Redarc products across the caravan and 4WD accessory market. For example, the Tow-Pro Brake Controller has long had few peers when bringing a big van to a safe stop. So, when Redarc suggested we should trial some of its power products in our Operation 200, I was delighted.

Our van has an adequate onboard power solution with 400W of solar and a couple of 110Ah AGM batteries. We run a three-way fridge, and while it doesn’t challenge the 12V power, we recently locked into Starlink, which needs 240V power from an inverter, and we have a myriad of cameras, computers and phones that need daily charging. It would be great to have enough power to charge all these devices from the vehicle rather than have them rolling around in the van. But the big win with the option of decent power in the 200 was the prospect of running a fridge, and we had already made provision for one with our MSA storage system.
When the Redarc equipment arrived, I was impressed with the quality of the selection, which included a 100Ah lithium battery, a Core DC-DC charger and an R1-12-1500RS 1500W Pure Sine Wave Inverter. Here was a power source for our needs but because the charge was from the alternator when the engine was running, I learned that I still needed to keep an eye on battery condition when camped for a few days.
The LBAT 12100HD battery is rated at 1280Wh with a maximum discharge current of 17A for 30 minutes. Redarc recommends it for charging smart devices, running air compressors and fridges and medium wattage 240V devices when used with an inverter. The BCDC Core charger was recently released as a more economical option to the Classic range. It lacks the water and dustproof insulation of the Classic, so it’s designed for in-cabin use, as we have in the back of the 200. Its inbuilt MPPT solar regulator allows charging from the vehicle alternator or a solar panel. It runs silently, and like all Redarc products, it's made in Australia.
The Pure Sine Wave output of the inverter ensures the safe charging of vulnerable computers and valuable devices. A built-in fan ensures cool running when outputting high loads, and there are protections for overloads and short circuits.
I got to work with the battery and charger so we could run the fridge, but the inverter looked a bit more complicated, so I postponed that till we hit the road.
When I started exploring places in the cargo area of the 200 to fit the battery and charger, it looked like Redarc and MSA had got together to make a dedicated spot for the installation. The wing space of the drawer system on the passenger side was the perfect size to slot in the lithium pack, while further forward, the charger would happily live on the plastic wheel arch. They would both be well protected and out of harm’s way under the sturdy MSA covers.

With experience from fitting the wiring for the Aerpro sound system, I soon removed the covers at the door sills to run power to the start battery. It was then a simple matter of connecting the earth lead to the vehicle body behind the 12V accessory plug at the rear.
The wiring diagram with the charger gave clear directions for various ways to install the battery. I chose the system that allows easy removal using Anderson plugs instead of permanent lugs. Redarc specifies wire size and crimping techniques, so I was confident everything would work correctly. But to ensure everything looked shipshape, I bought a decent wire stripper and crimping tool. After connecting everything according to plan, I checked the job a dozen times before I was game to start the engine and ensure everything was working as it should. With the diesel V8 ticking over at idle, I’m happy to report the charger showed all the right lights. The charger clearly indicates the power source — alternator or solar — and the state of play with the charge. I wired the battery to the MSA power outlet, which was soon reading 13.6V. Success. One of the leads from the charger offers a light for the dash to show when the battery is being charged, which I have run to the bulkhead for installation next time I need to remove dash panels for some other task.
With time running out for our departure to the west, I left the inverter until I had more opportunity to think about where it should go and to build the confidence to tackle the 240V hurdle. I should note that Redarc allows DIY installation for inverters up to 1500W but insists that a professional must undertake the fitout over that.
The instructions for the installation are unambiguous, but I was surprised at the specs for the wiring needed for the inverter. A parts supplier in Broken Hill had never heard of AWG 000 cable — more than 10mm in diameter — so I rang Redarc to check. Their support team are very knowledgeable and has an immeasurable depth of patience and excellent communication. They explained the high current demand for equipment rated to 1500W needed high-quality power leads. I found 000 cables ($28/m) at an auto electrician, but even he questioned the size. I’m happy to accept that Redarc knows its product and has specified the wiring to cope with high current loads safely.
It wasn't until we had a few days spare in Alice Springs that I finally attempted to set up the inverter. After much experimenting, I found it fitted perfectly on the forward face of the MSA fridge barrier, where it is quickly accessible. I screwed the base to a 300mm section of 50mm x 25mm ply, which fixed to the drawers and at the top to a flat section of aluminium extrusion. The tolerance to the rear seat was perfect. With suitable lugs clamped and insulated, I connected the inverter to the battery and the job was done.

The battery keeps our 60L fridge running at -18°C for around 20 hours once camped, and it takes a couple of hours of driving for the full recharge. We ran a Starlink satellite receiver from the inverter for six hours while also running the fridge, and this was pushing things. The lithium battery 'went to sleep', which meant the whole system shut down. I discovered this is a common feature of lithium batteries, and in the case of the Redarc product, sleep mode kicks in at 10V. Once shut down, the battery has to be to be connected to an external 12V power supply for it to 'wake up'. I made a lead with an Anderson plug to the 200's rear power point and a couple of alligator clips to connect to the battery, and it did the trick allowing us to recharge the battery. When camped we found the ambient temperature increasing as we head further north so we now top up the lithium battery from a solar panel which gives us unlimited operation of the freezer.

The onboard power gives us security for our electronic devices, the ability to run a decent size freezer and the occasional use of 240V appliances. We hooked up an air fryer for frozen salt and pepper squid to add variety to our meals, so the inverter adds even more versatility to our setup. I'm happy with how things work, especially now that I have learned to monitor power usage better.
The 100Ah lithium HD battery retails for $1998, the BCDC Core Charger is $429 and the 1500W inverter is $1700.
Communication is key
For me, a UHF radio is essential equipment for towing a caravan. The ability to communicate with other road users, especially trucks, is a genuine safety issue. Sharing your intentions with other road users is also good manners. Nothing annoys drivers more than following a van holding up the free flow of traffic. It not only provokes road road, but it also encourages reckless and potentially dangerous overtaking.

We all have a right to be on the road, that's true, but common sense tells us to understand that if you are travelling slower than the speed limit, you should let other drivers pass. Most cars can take advantage of shorter overtaking lanes, but trucks with heavy loads need time to accelerate and pass safely. If you have a radio, you can talk to the truck driver and tell them you will slow down when they pull out to overtake, or that you'll pull over at the next chance you get to let them pass. They will be grateful, and you will avoid the stress of having them following close behind.
Using a UHF radio is simple. You can even have your passenger make the call, letting you concentrate on the road. For valuable advice on how to use a UHF radio, check out Ken Wilson's Truck Friendly web page (truckfriendly.com.au).
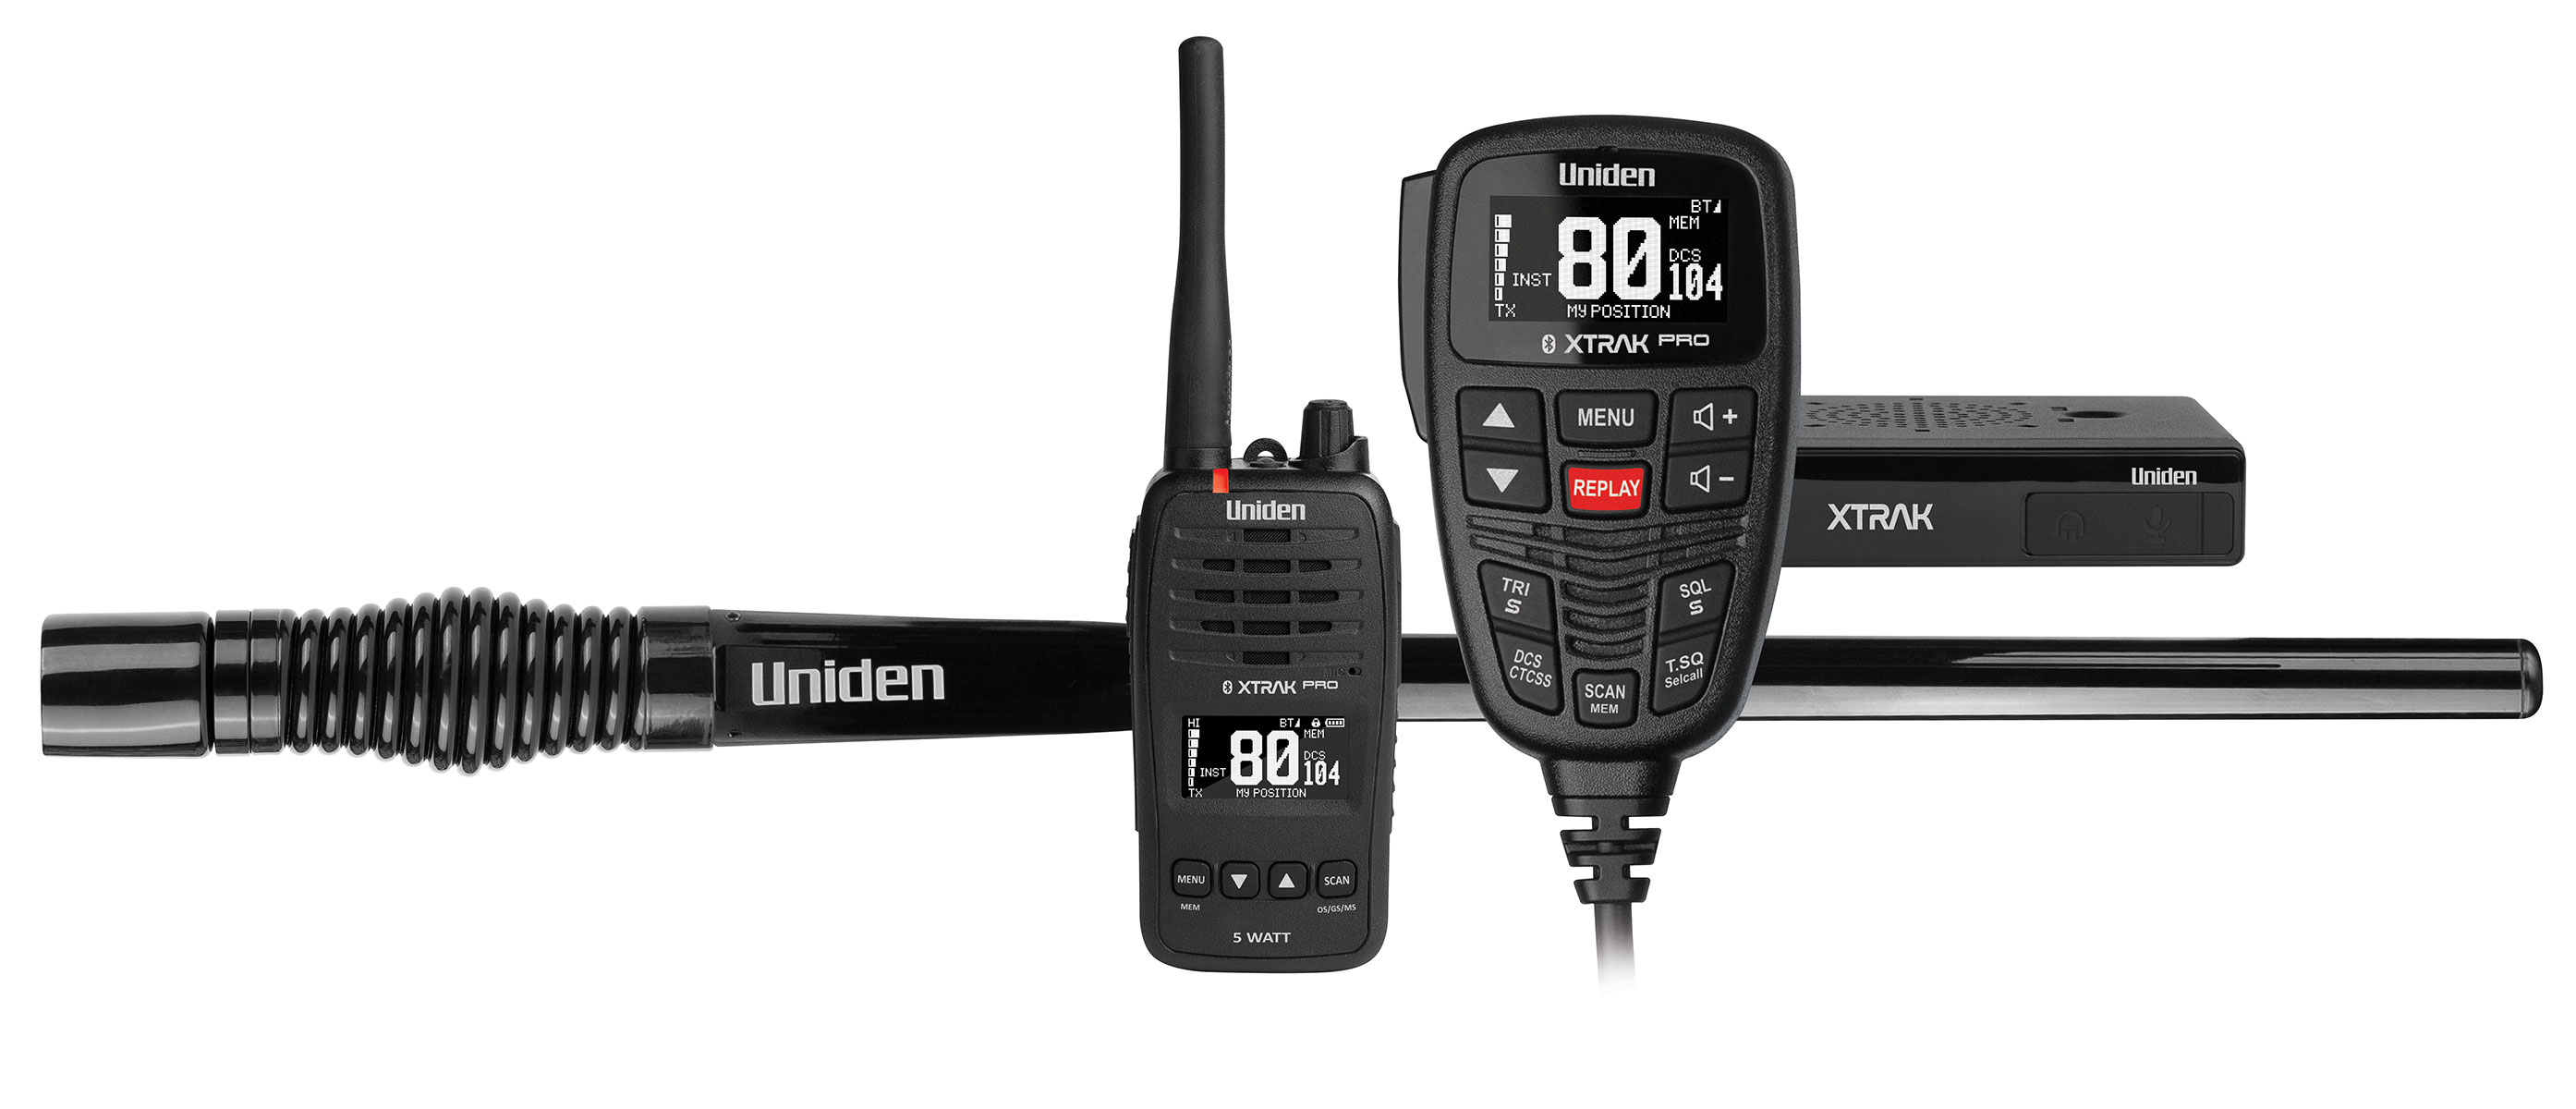
So, with our shiny new Ironman 4x4 bullbar now in place, we had the perfect post to mount an aerial, and we set out in search of a suitable radio. Uniden offered one of its latest XTRAK 80 Pro Ultimate Packs, and I soon realised it’s more than a simple radio. The kit arrived with an in-vehicle 80-channel unit, a heavy-duty aerial and a handheld 5W unit. The kit included all the necessary cables, and both 240V and 12V chargers for the handheld’s lithium battery.

Uniden is a Japanese headquartered company, has a longstanding history of supplying high-quality communication equipment for Australian road and weather conditions. Its reputation, coupled with the excellent look and feel of its products, gave me a high degree of confidence that Uniden would be up to the task.
You have the flexibility to mount the main radio anywhere under the dash, thanks to the remote microphone’s clear organic light-emitting diode (OLED) screen and built-in controls. I attached the aerial to a slot in the Ironman 4x4 Bullbar, threading the lead into the cabin through an opening in the firewall. Once the base unit was secured under the dash, I wired it to 12V power using the supplied cable and mounted the magnetic base for the microphone to an appropriate spot on the dash. The whole installation process took about 40 minutes.
We have been using the Uniden UHF radio for the last month on our journey with friends in other vans to Western Australia, and the communication between the group has been excellent. The 3dBi gain aerial is best suited to signals within a couple of kilometres, and will work out to 12-18 kilometres on flat terrain, so it was ideal for travelling in a convoy where we each stayed around 400m apart. Those looking for longer-distance coverage should investigate a 6.6dBi gain antenna. I mounted the 5W handheld radio in a small cradle to communicate with other road users.
However, the smaller radio only got a little use between the NT’s Alice Springs and Carawine Gorge in WA as, on the Gary Junction Highway, we only saw one truck and two other vehicles. Once we reached Marble Bar in WA’s north-west, there were a few ore-carry road trains, and it was great to talk with them as we negotiated our way past.
I particularly liked the instant replay function, which recorded up to six minutes of received messages — a great feature for replaying directions. Another feature of the twin radio pack is Uniden's location-sharing app. This app connects both the in-car and handheld radios to a mobile via Bluetooth, providing precise locations of the radios. This means you can walk away from the vehicle with the handheld radio and have an accurate map of the vehicle’s location and vice versa.
The XTRAK 80 Pro Ultimate Pack is a beautifully engineered piece of electronics. It has proven to be a versatile and handy addition to our equipment list. The sound quality is superb, and the radio is simple to use and reliable.
The XTRAK 80 Pro Ultimate Pack retails for $999.95. The Adventure pack with in-car radio and antenna is $569.95.
THE NEXT STEP
Are you ready to experience the freedom of the open road? Don't wait - Find your dream getaway now!
RELATED ARTICLES:
Operation 200 Part 1: Legal and loud


