
Operation 200 Part 2: Safer towing and better storage

Looking back
In part 1 of this series we covered why a gross vehicle mass GVM upgrade is necessary if you want to add extras to your vehicle and still tow a van legally and safely. Our new Tough Dog suspension has added 500kg to our payload and means our 200 Series LandCruiser has much superior carrying capacity. The extra payload alloys us to fit items to make touring more enjoyable and probably safer.
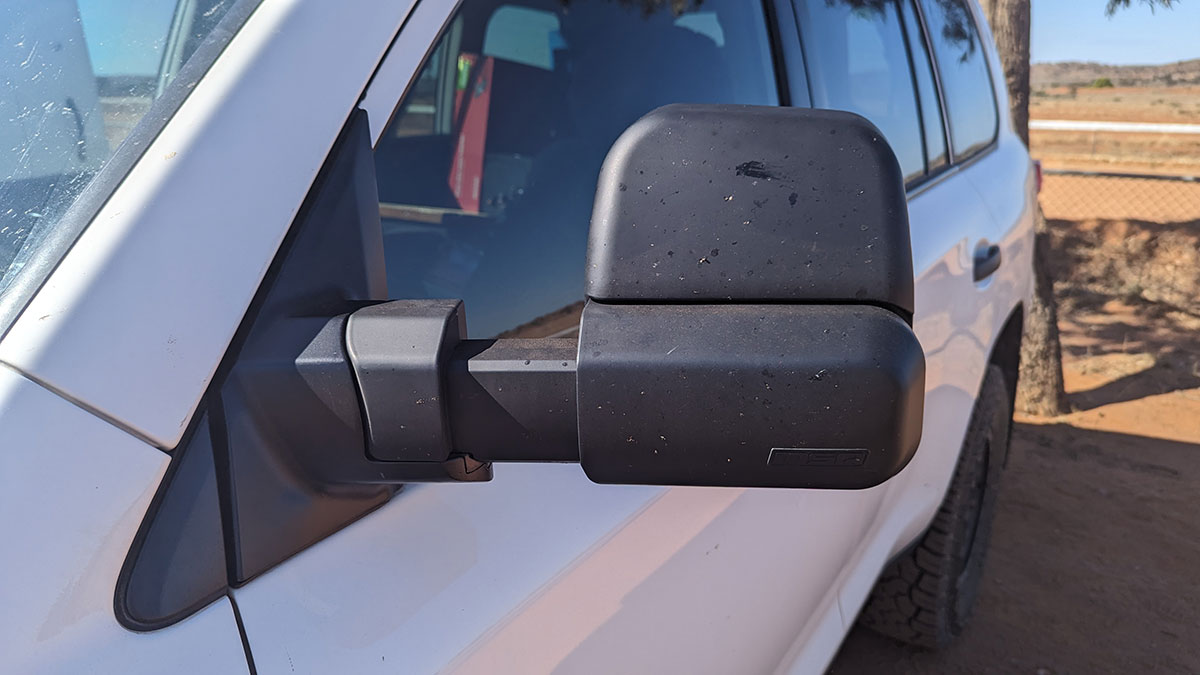
While not an accessory that adds weight, our first improvement to our Operation 200 is a set of MSA Towing Mirrors. The law requires you to see along the side of the van and the standard 200 mirrors don’t extend out far enough to do that. Coming in a range to suit most 4x4 vehicles, the MSA mirrors are Australian Design Rules (ADR) compliant and extend for a legal and clear view of following and overtaking traffic.
The mirrors look great, and they won a design award at the Specialty Equipment SEMA show in the USA. We chose the black version, but there’s also chrome, and they feature a large single mirror pivoting on a heavy-duty extension slide. It’s easy to move them out when towing and they pivot back if you needed. They can be set in either a vertical or horizontal position, and the mirror’s actuator automatically adapts to give up and down and side to side movement.
The mirrors have a quality feel and the injection moulded plastic and die cast body seems heavy duty and robustly built.
 Step 1: Remove door panel to access fastening
 Step 2: Three bolts hold the mirror on
Fitting the mirrors is pretty straightforward, but I recommend a set of panel removal tools to keep your trim in good shape. Pop off the corner trim ahead of the window and unscrew the trim around the door handle and the door panel will pop off enough to get at the three bolts holding the Toyota mirror on. The GX has no indictor lights in the mirrors but there are wires to control the mirror movement which will need to be swapped over. Bolt on the new mirrors, fit the electrical leads and refit the trim.
 Step 3: Electrical connections are supplied
It’s been a few weeks since we installed the mirrors, and I am extremely pleased with them. The view of following traffic is much improved over the bolt on version we had, and they are rock steady on rough roads.
 Step 4: Mirrors at standard position
 Step 5: Mirror extended
 Step 6: Mirror extended and folded flat
Contact MSA 4x4 Accessories for pricing.
'Drawer' me a picture
One of the annoying things when travelling is being able to quickly get your hands on all the things we take along with us. It might be a tool, your swimming or fishing gear or the small gas cooker for a quick cuppa. Packing everything in the back of the car and hoping to find it is a big ask. So, now that we have a bigger payload, the next addition on Operation 200 is a set of MSA’s aluminium storage drawers. This will give us ample storage and a decent supply of freezer space.

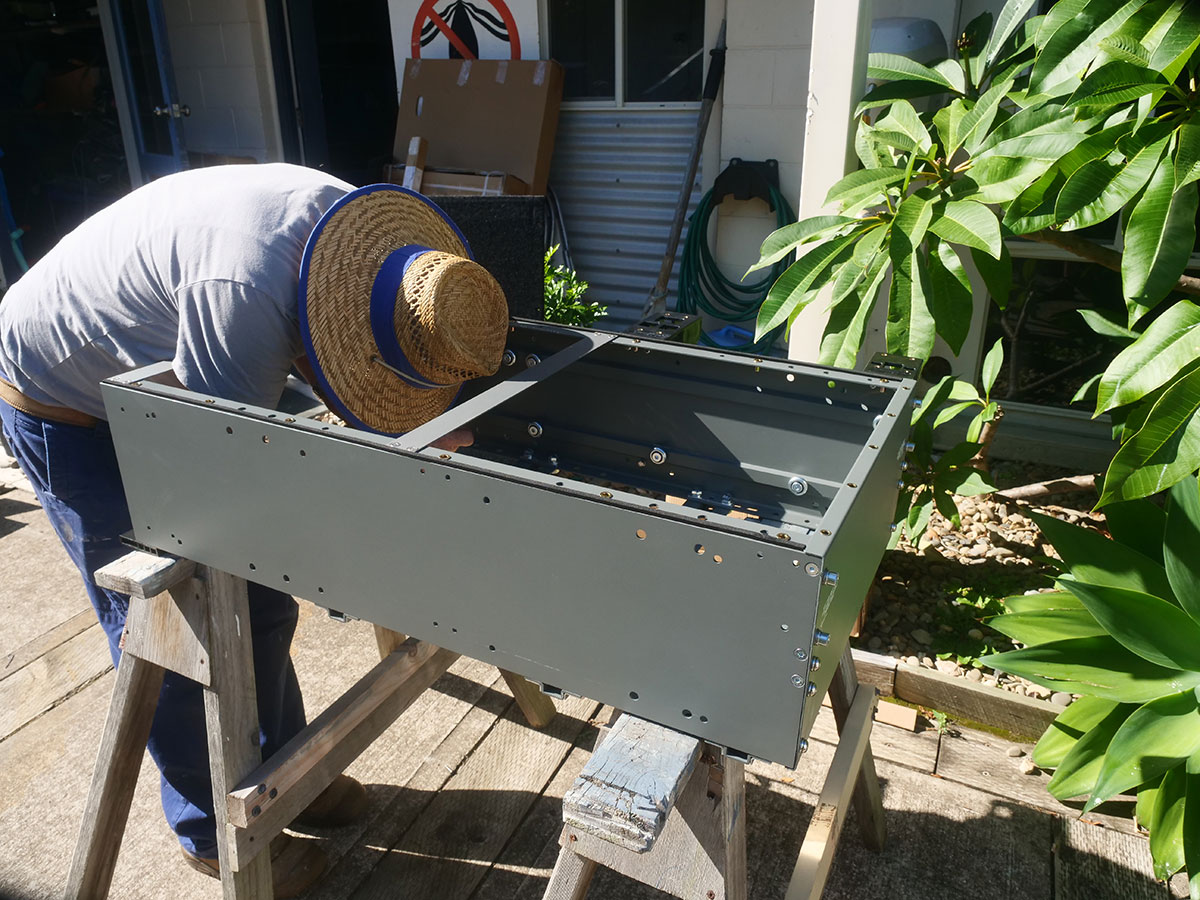
Because the MSA drawers are so well engineered, expect to add around 80kg to the vehicle’s weight. My initial reaction when I saw the heavy-duty steel runners and sturdy aluminium frame was that the setup was something of an overkill, but as soon as I realised they are ADR approved and come with a lifetime warranty, the robust engineering made sense. Very clearly, these drawers are made to take a big load and years of tough treatment.
MSA makes a range of storage systems custom made to suit most of the popular 4WDs. We soon discovered the double drawer set for the 200 fitted perfectly and look like they come as original Toyota equipment.

Comprehensive instructions take you through the installation process and the fitting took around three hours. All the hardware is equally robust stainless steel and after fitting the frame we soon had the two drawers in place to be joined together. MSA makes its drawers to suit LandCruisers with a third row of seats where the drawer bases bolt to the slots for the seats. As the GX lacks the seats and the standard bolt placement, you will need to talk with your MSA dealer about fitting the system to the ‘poor cousin’ GX.

A strong marine carpet lined plywood lid covers the rear ‘wing’ space with two removable lids each side over the void between the drawers and the side of the car. No space is spared for storage. Aluminium C-sections screw on to protect the leading edge and the finished result is remarkably neat.

I liked the way the top of the drawers is level with the folded second row of seats. It means longer items can pack in over the drawers and seat. It also offers a place to sleep for one person in the back of the vehicle if you are looking for a quick overnight camp.

Finishing touches like stay-open automatic latches, dust seals, smooth side walls and LED lights that come on when the drawers are fully opened set the MSA product apart. The stay-open mechanism holds the drawers in place for access even on a 30-degree slope and because they open past the end of the drawer cabinet, it’s easy to access everything inside. You can lock them, and the mechanism is designed to be tamper proof. Assembly was around four hours and it’s best as a two-person task to lift some of the components into place without scratching the interior. Each drawer can support 250kg and measures 1045mm x 530mm x 275mm, so once fitted the amount of storage is remarkable. I like the height of the storage and the quick access to items right at the back. The 275mm height means plenty of larger items can fit and I included two layers of tools in canvas rolls and a metal 20L jerry can just to test the capacity.
We have taken advantage of the two wing areas for very different outcomes. The driver side now houses a mix of vehicle spares while the passenger side proved to be the perfect place for extra electronics. We will come to how we did it in the next issue, covering how we mounted a house battery and charger to be safely and neatly installed in the bonus side pocket space.
Caged and cool
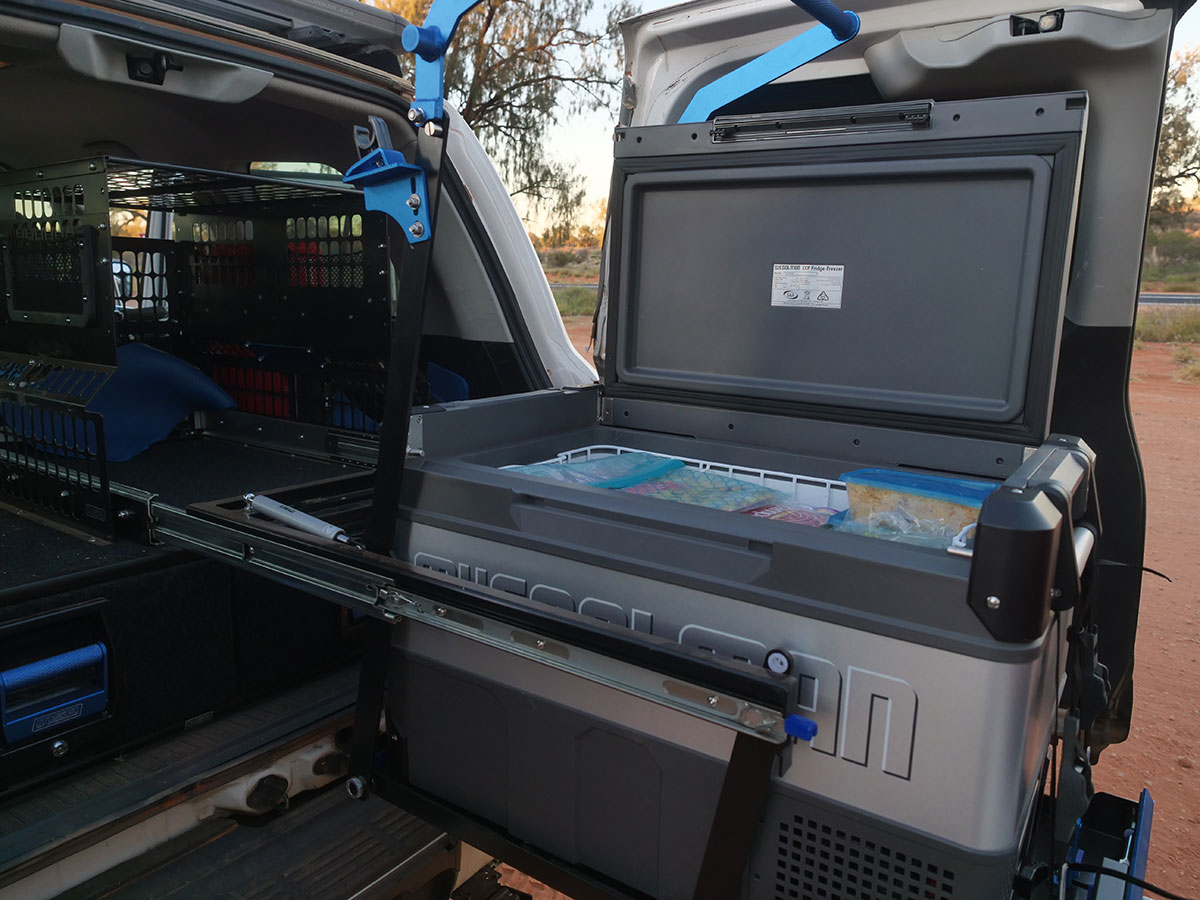
We will report on the 60L myCOOLMAN fridge/freezer later, but the next stage of the build was to fit the suitably sized fridge slide and a protective cage. MSA makes slides and fridge barriers for all popular sizes between 40L and 95L and they are built with the same level of quality and presentation as the drawers. A blue anodised aluminium handle adds to the impressive look and the black powder coated steel frame should continue to look good for years. Again, the warranty is lifetime so you know the engineering is spot on.
With barn doors on the rear of the 200, the logical place for the fridge slide is on the driver side so that often used items like chairs can be reached by opening only the smaller passenger side door. We set the slide in place and measured the fridge height and located the assembled fridge barrier on the top of the drawer system. I wanted to make sure there would be access to the driver side storage wings once the whole thing was screwed down. It is important to make sure the slide has plenty of room to move back and fold down and that the back door has clearance when it’s closed. It was all pretty obvious once we followed the instructions.

The slide operated smoothly and effortlessly, and it lowers 30cm horizontally for easy access from the side to the freezer contents. A lock prevents the slide from opening until you are ready and keyed travel locks keep your beer supply safe. A set of four tie down straps connect the slide to the fridge handle to keep it in place and to stop any rattles when driving. An added feature is a 400mm x 420mm table in 316 stainless steel that slides out from under the tray. It’s a handy place to stack items when loading the fridge or for having a quick cuppa on the road.
The barrier allows packing lots of items around the fridge without loose gear impeding the air flow needed for efficient cooling. It will also protect the fridge from dints and scratches over years of service. Small side pockets are a good place to store smaller items that you use regularly, and a supplied bungee cord will keep the electrical lead clear when sliding the fridge back.
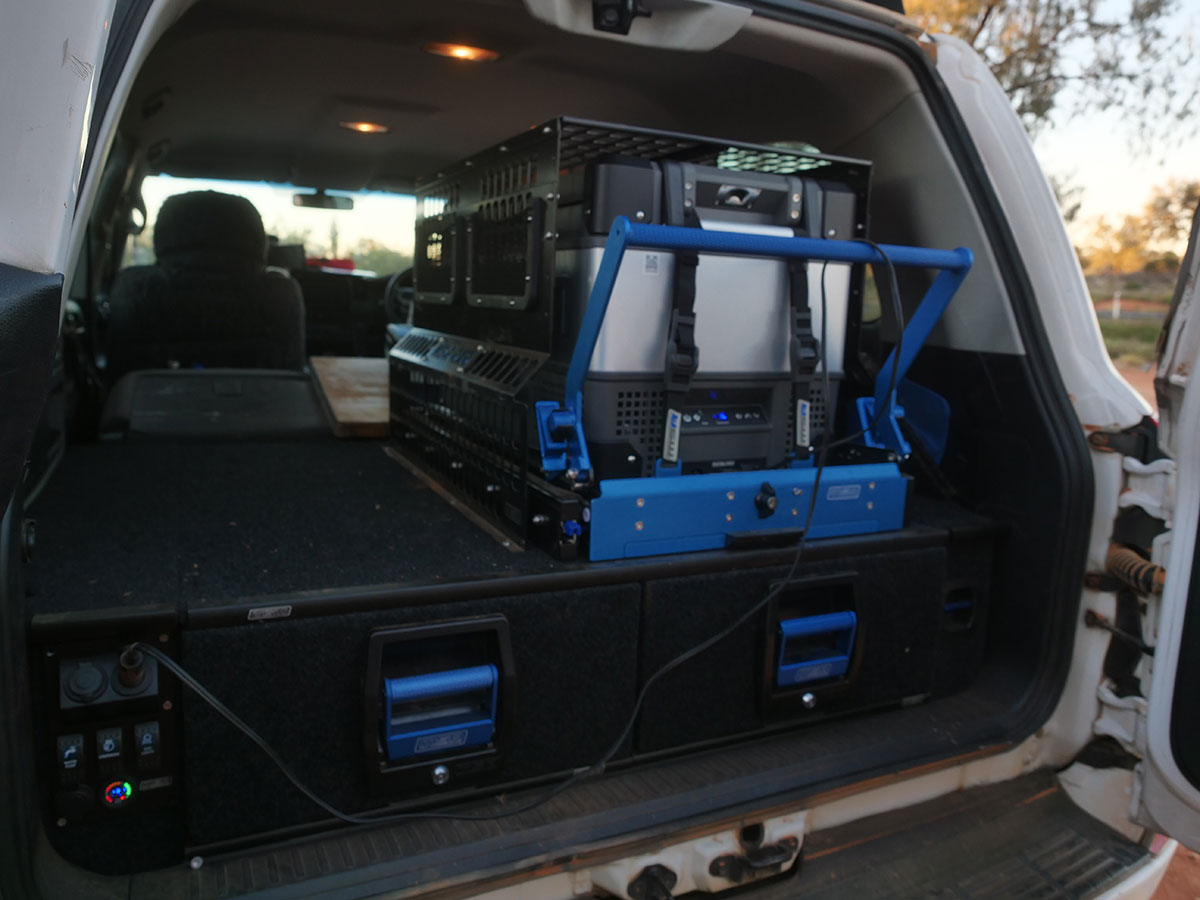
Power on hand
MSA has covered all bases with a custom Power Panel for the side of the drawer system. We installed the prewired panel to the passenger side of the drawers into a pre-cut carpet lined fitting to replace the wing faceplate. The panel fitted seamlessly into place, and we wired the panel into the adjacent stock power outlet. The panel includes three rocker switches for accessories, two USB slots and two cigarette sockets, one of which powers the fridge. I like the way the sockets are angled down so that plugs have more room to the back without fouling on the rear door and how an injected moulded cover protects the back of the wiring panel.

The wrap
We have now been on the road with the MSA setup for a few weeks and I remain impressed. The drawers are a real improvement for storage, and I feel we are making the most of our extra weight capacity without going overboard. The drawers operate smoothly and there’s never a problem keeping them open when in use. The fridge slide gives quick access to the cold storage and the cage has kept the air circulating effectively.

Go to the MSA 4x4 Accessories website for pricing and how to order.
THE NEXT STEP
Are you ready to experience the freedom of the open road? Don't wait - Find your dream getaway now!
RELATED ARTICLES:
Operation 200 Part 1: Legal and loud


