How to install a gas heater

It’s all well and good to have a reverse-cycle air conditioner in your van, but you need a generator when you’re free-camping to use it (or a very expensive, high-tech lithium battery/solar set-up).
In warmer months, you would just crack open windows and hatches but, if you’re free-camping when it’s cold, you don’t always want to just rug up. One option is to install a gas heater that runs off your caravan’s existing gas cylinder.
Here, we’re installing a Truma E2400 gas heater system. The system comes with the heater unit, a control unit, control panel and ducting for inlet/exhaust and heater output. It also comes with other hardware to fit the system, such as wiring, retaining brackets for the heater unit, vent outlet and air inlet/exhaust outlet fascia plate and cover.
Because part of this job involves installing gas fittings, at best, you can only do the non-gas install part of this job yourself and sub-contract a licensed gas fitter to install the gas components. You also have to consider the dangers of exhaust fumes, so how and where you install the air in-let/exhaust outlet are crucial.
This is by no means a DIY beginner’s job — you need to have some experience on the tools. But we’ll take you through what the caravan workshop does to install a gas heater in your van.
WHERE TO PUT IT
First up is to find the best spot to fit the heater unit. It has to be installed close to an external wall for inlet/exhaust (in the Truma’s case, depending on the way it is positioned, up to 150cm from the wall), and in a position where the ducting can’t be easily damaged.
The heater vent outlet needs to be close enough to the heater unit so that air pressure isn’t diminished (up to a metre). In this case, with a front dinette, centre kitchen rear bedroom van, the unit was installed under the dinette seat on the nearside front.
The inlet/outlet point can’t be near a window or be within an annexe. You also need to check that you’re not going to cut a hole for the inlet/outlet though existing plumbing or wiring.
Once you’ve checked the above, you cut a hole with a hole saw through the side of the van. Then the inlet/outlet ducting (which as an inner tube for exhaust and an outer tube for air to be drawn in for combustion) is fitted through the hole and the other end attached to the heater unit. The excess ducting is cut off, then the ducting is clamped to the duct retaining plate. The retaining plate is se-cured to the side of the van with self-tapping screws, and then the fascia plate is attached to the retaining plate the same way.
A travel cover is supplied with the Truma unit, to help avoid dust/moisture ingress when on the road.
The gas line into the heater unit from the main gas line under the van is now installed (not pictured), and then the heater unit can be secured to the wall and floor. Before doing so, check that the screws won’t pierce wiring or water or gas lines on the other side of the wall/floor.
The control unit cover is taken off so that the heater switch wiring can be plugged into the circuit board. Then the cover is replaced and the control unit attached as close as is practical to the heater unit.
The heater switch wiring is routed to where the heater switch is to be fitted. The wiring in this case is cable-tied to the seat frame so that it doesn’t impede use of the under seat storage area accessed by an external hatch
An existing cover plate for an external light fitting is used to cover the wiring cable on the wall and the switch itself is secured in position with self-tapping screws.
The best position for the heater outlet for this van was deemed to be on the seat base side facing the rear of the van. That allowed heated air to be directed down the walkway towards the rear bedroom, although the swivel vent plate allows adjustment of air flow elsewhere if desired.
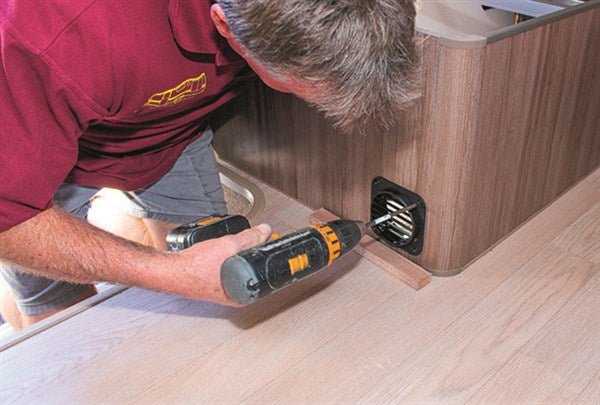
A hole saw was used to cut an opening in the seat base for the vent outlet. The vent was then se-cured to the hole and the duct routed from the heater unit to the outlet. Two more holes (not pictured) were cut in the seat base to allow fresh air to be drawn in to the heater unit.
Finally, the heat unit wiring is hooked up directly to the van’s onboard battery.
With thanks to Barnes Caravans, 121 Hume Hwy, Lansvale, NSW 2166, (02) 9728 6366 for their assistance with this article.
The full article appears in Caravan World #555 September 2016. Subscribe today for the latest caravan reviews and news every month!


