
Caravan safety with the WiTi Anti-Theft System | Part one
Editor John Ford installs the WiTi Anti-Theft kit in his Trakmaster caravan.
When we leave home to adventure into the Australian bush, we abandon our comfort zone to put a lot of trust in humanity and, most of the time, that trust is rewarded. There’s a mythology among the caravanning community that we help each other out by sharing our time and expertise if someone is in trouble.
But there are other ways we trust humanity, like being able to leave our van unguarded to check out the local area or head out for dinner. Unfortunately, society is changing and our faith in others is being tested. An unguarded van can be an open invitation for some to help themselves.
Last year, one of our travelling companions suffered a break-in at a caravan park on the west coast. A few of us were watching the footy at a mate’s van and having a great night, but when one couple went back to their van only 120m away it had been burgled. Cash, clothes and car keys were stolen. If you have been robbed, you know the feeling of anger and frustration. The loss of cash and electronics was exacerbated by the damage. A new door was over $1000 and then there’s the lost time fixing things and dealing with the emotions.

Tony Maddison might have a solution. Tony is a Perth based IT specialist and a an experienced caravanner. On one of his trips a few years ago when camping with his mates, he had a light bulb moment when they recognised an opportunity for an integrated wireless solution to guarding your van. After initial research WiTi was introduced in 2018 and has grown into a leading WA technology company. It’s Australian owned and all components are manufactured in-house including circuit boards and 3D printing of the plastic enclosures.
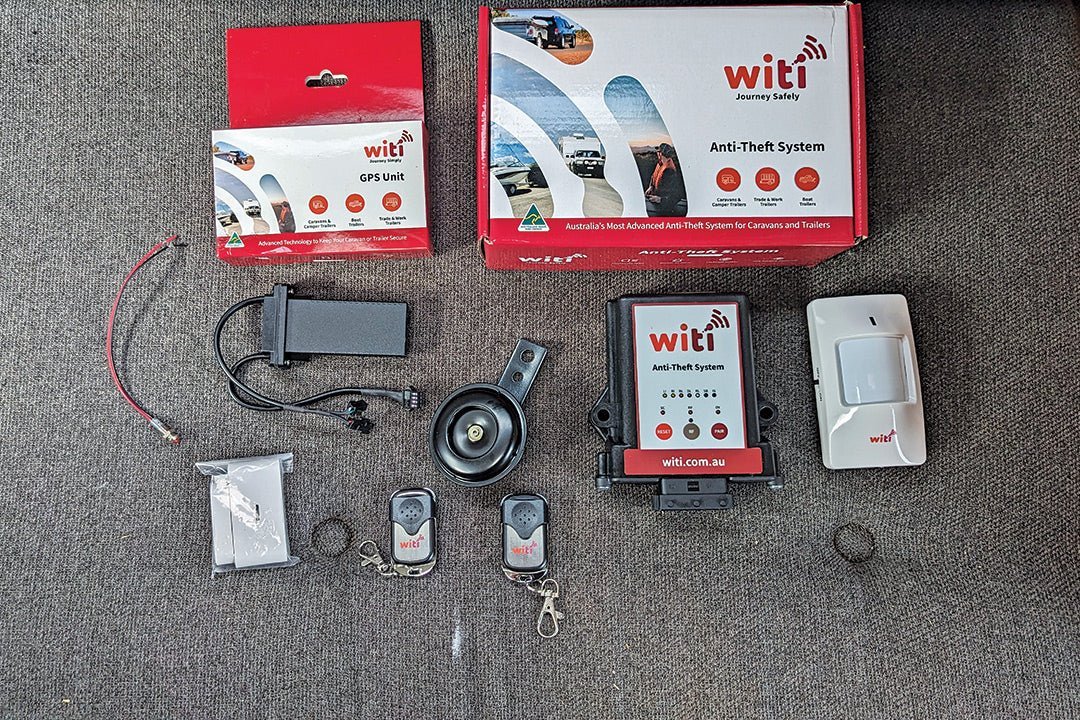
The anti-theft system suits all vans or trailers with electric brakes and comprises a motion detector, a door alarm and an infrared vision sensor. When movement is detected by one of these sensors, an alarm sounds and the system applies the caravan brakes. During the development stage over several years the concept grew into an integrated wireless caravan system that not only works as an alarm, but it also works wirelessly to operate the lights without connecting the van into the seven or 12 pin plugs. They then took it even further by connecting the brakes using a sophisticated wireless brake controller when towing.

DIY installation
Tony was keen to have me do an installation on my Trakmaster van to show it’s a fairly easy DIY prospect. The WiTi has several options. The basic kit has the anti-theft unit, to which you can add a GPS tracker, the WiTi Wireless Towing Interface for external lights on the van and the Wi-Fi Brake Controller.
They sent us the complete kit and this month we will go through installing the alarm. In part two we will review the Towing Interface, Brake Controller and GPS tracker.
The instruction manuals are small booklets for each of the components and the instructions are very generic but there’s a video on the website that's helpful. My advice is to read them all thoroughly and, in my case, it took about three times for it to sink in.
The Anti-Theft System is the heart of all the various applications, and it needs to be installed vertically towards the front of the van facing to the back. You need access to check the operation, but I suggest keeping it hidden as much as possible. The unit has various LEDs to show which light is working so it’s easier to track down any issues. It also has lights to show it’s connected to power and the state of the alarm. The main box is about 100mm x 70mm and has lugs that let you screw it to a wall. The kit comes with a wiring loom with 13 different colour coded wires that go to the van battery, a horn, a small indicator light and the seven wires to the trailer lights and service brake. These wires on the loom are about 20cm long, so you need to complete the loom with your own wires which you need to purchase for the job.
It’s straightforward but you must work out how long each of the cables needs to be and where they are going before you start soldering wires together. The instructions are a little vague on the size cable you need but it does mention heavy duty seven core wire — 4mm each strand — which wasn’t available at any of my local stores, so I had to order it in. The cable to the battery also needs to be up to the task as the system is rated to 25A to the brakes, so I chose 6mm to the battery. While you’re shopping, make sure you have various sizes of corrugated split tubing to protect the wires from chafing and stone damage, suitable tech screws, solder and electrical tape.
It might be worth noting that, as the alarm runs off the caravan or camper trailer battery, you need to have a charging source such as solar or a battery management system (BMS) going to the alarm if the van is stored for long periods. Ours has plenty of battery power and three solar panels so it should be more than enough.
Some challenges
The suggested installation time is about three hours, but the Trakmaster proved a bit more complicated due to all its wiring for lights running through the chassis and straight to the various trailer lights inside composite walls. I reckon I spent at least 45 minutes looking for access to the trailer wiring and eventually decided to run the new loom to the A-frame. A simpler setup would be straightforward in comparison.

First up I drew a plan of how I was going to tackle things. The first task is then to solder the long wires to the supplied loom on a bench outside the van. For the main control box, I chose a hanging cupboard at the front of the van where it could be inspected but was out of the way. From the cupboard, wires go through a partition wall behind a set of drawers and through the ply floor, checking that there was nothing in the way underneath. (Drilling through a water line under the van will spoil your fun.) The wires all poke through the holes and suitable grommets protect the wires.
I also mounted the miniature GPS unit behind the drawers where it would be very difficult to find — except if you’re reading this I guess, but you lot are trustworthy.
I mounted the horn under the floor close to the chassis right where the wires dropped though. It’s waterproof but I tucked it up out of the way. Some installers will mount the small LED light on the cladding near the door and that might work if you want to drill a hole. I lucked out when I found a small 90-degree bracket left over from an IKEA project which screwed neatly under the van’s lower edge. It looked a bit daggy, so I finished it with some carbon fibre tape I bought recently on a whim. Isn’t Temu wonderful?

The external LED light shows when the alarm is armed
Access to the van battery was a little tricky as it’s mounted in a sealed box in a locker at the side of the van — predating current regulations by 10 years. So, I ran the wires across under the floor and drilled a hole under the bed adjacent to the battery box and ran the two wires through an existing tight-fitting grommet and into the battery compartment.
Wiring into the trailer plug was a bit of a pain, but I eventually found a route out of harm’s way and along the A-frame where I tapped into the seven core wires. It was then a case of tidying everything up with a small ply box under the anti-theft box to cover the wires and some saddles to keep the wires from sagging.
Oh yeah. There are two battery-powered remote control alarm sensors that need to go inside the van. The first is a simple door alarm and the other is a motion sensor which I screwed to a high position at the front. Which is at the opposite end to the entry door.
When I powered up the anti-theft device and it worked straightaway, I shouldn’t admit I was surprised, and it wasn’t only the horn going off when I stepped in the van. It’s great when something so sophisticated does what it’s supposed to do without fuss.

The horn screws under the floor and wires are protected in covers
The WiTi has two remote controls to set the alarm and turn it off. The external red LED tells you the alarm is activated so you know it's on when you approach the van. The remote easily turns the system off. Pretty simple. With the alarm set I started to drive the van away and the brakes locked up at the same time the alarm sounded. That’s going to make the van hard to steal and offer a lot of peace of mind in the process.
The WiTi anti-theft system is $649 and that includes the magnetic door switch and the PIR Motion Sensor. Given what it can do, I’d say that’s a steal.
Keep your eye out for part two to find out more.
THE NEXT STEP
If you want to learn the latest caravan news, find the most innovative new caravans and camping gear or get inspired to plan your next adventure to some of Australia's best getaway destinations, subscribe to our weekly newsletter. We promise to send you only the best content.


