
TIPS: HOW TO SET UP AN ANNEXE
BACK IN THE DAYS when Holden Kingswoods and Viscount caravans reigned supreme on our roads, I remember dragging a heavy canvas awning down from roof-mounted sail track. This was followed by setting out the poles and ropes, and hooking the equally heavy walls to the awning. In addition to often playing hell with your back, this wasn’t exactly a speedy process.
Even with modern designs, properly setting up an annexe can still be something of a tricky process, but this step-by-step guide will hopefully make things a little easier. The job itself should take around 15 minutes.
Retractable awnings and their instant shade and weather protection (from companies such as Fiamma, Aussie Traveller and Dometic) have undoubtedly improved things no end for RVers. But companies like Kakadu and Australia Wide Annexes have taken things a step further. These companies also design and supply walls, screens, doors and extensions that considerably improve living space – a real boon for travelling families.
Kakadu’s Bruce Anderson recently invited me along to his company’s factory in Currumbin, Qld, to see a new annexe going up for caravanners Dave and Val Hobbs. The couple was getting a demonstration at the factory, rather than a van park or campsite, because Dave has some difficulties walking and lifting heavy items and wanted a few expert tips for easy assembly.
STEP BY STEP
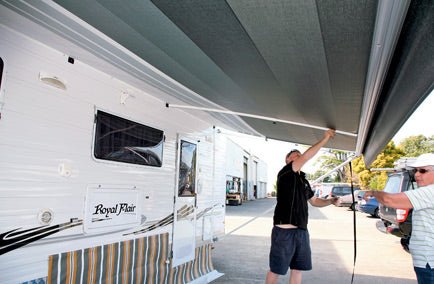
01 The awning – in this case a Dometic A&E – should be fully opened and tensioned up using the roof rafters, which are fitted by using plastic clips on the van and spigot holes in the roller tube of the awning.
02 It’s helpful to lay the walls out before fitting. Here the roof rafter is fitted into the gable sleeve of the end wall.
03 Attach the end walls to the caravan by sliding the wall edge up the sail track. Applying silicone spray to the sail track makes this process a bit easier.
04 With the ends in position, the roof rafters can be tensioned up and the walls attached to the draught sheet.
05 Like the end walls, the side walls are laid out before being run along the slot in the roller tube. Again, silicone spray can be used to ease things along. (Although side walls are usually a single piece, in this case they were split in two to make things easier for the owner.)
06 Once all walls are in position, they are zipped together at the corners (and the middle in this case).
07 All poles can be fitted into the roller tube holes and velcro-strapped to the walls.
08 The doors can now be zipped in position as required. One tip from the Kakadu team is to roll the doors inward – this keeps things neat and prevents rain from gathering in the externally rolled door.
09 Once you have set out the wall mudflaps and laid out the floor matting above them, connect the end walls to the awning with the “stayputs”.
10 At a campsite, you would now be pegging out the annexe walls – but this proved a little hard to do on the concrete.
WORDS AND PICS Malcolm Street
Source: Caravan World Oct 2011
More tips and tricks


