
Tech: How to fit an external access door
CARAVANS HAVE BECOME more like rolling homes in recent years, with RVers cramming more of their holiday belongings in all of the storage spaces a van can offer. Whether it’s front boot, tunnel boot, under-bed or under-seat, storage is basically placed wherever it can fit.
But with all that storage comes the question of access. After all, it’s no good packing your gear under the dinette seats and then having to remove all of it when you need one little item.
It’s for this reason many caravanners choose to add an external access door to their van – so they can easily get to the internal storage spaces from the outside. It may seem a hard job, but it is actually a very do-able DIY task for the average backyard caravan repairer.
Glynn Magain from the RV Repair Centre in Bayswater, Vic, showed us how the job is done. The tools required include a drill (with driver bit), grinder (with cutting blade), staple gun and router or saw, as well as some foam sealing tape, plastic trim, silicone and, of course, the new access door.
The tools and silicone are available from hardware stores, while the door (from $185), tape ($3/m) and trim ($2/m) can be purchased from an RV repairer.
Cutting a new hole in the side of your van is a fairly time consuming task and each new access door will take around four hours to fit from start to finish. Another important factor to consider is the van’s electrics: if any cutting and re-attaching of wires is required, it’s best to get a licensed electrician in for the job.
STEP BY STEP
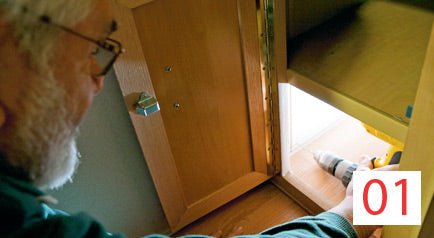
01 Establish where the new door will go – usually under a seat or the bed – and determine the floor level. This is done by drilling a hole through the wall from the inside and measuring 10mm (or whatever the drill width) below the hole.
02 Using the dimensions of the door, measure the size of the hole to be cut. This needs to be as accurate as possible.
03 Following your measurements, cut the aluminium skin of the van with a grinder (with cutting blade). Make sure you are wearing safety glasses and ear muffs.
04 Peel back the aluminium skin and look at the wiring in the wall. It is very important to see where the wiring goes before cutting through the frame. If there are wires in the way, you can either push them above the hole (if there’s room) before cutting, or have them cut and re-wired by a licensed electrician.
05 Having removed the foam insulation from the wall, pull away the aluminium skin around the edges and staple in pieces of timber to make a frame around the hole.
06 Cut around the edges of the wooden inner wall with the router or saw. Remove the piece of wood panel once cut.
07 Line the edge of the frame by gluing or stapling in a piece of L-shaped plastic trim. This will eliminate any dangers or annoyances of rough timber edges.
08 Apply the foam sealing tape to the edges of the access door. Make sure the edges of the tape overlap when they come together, otherwise small gaps could appear and let water or dust in.
09 Fit the door frame into the hole and screw it into the aluminium skin of the van. Glynn recommends the use of stainless steel screws because they are less susceptible to rust and other problems that come with harsh caravanning conditions.
10 Silicone around the edges of the door. This is extra protection to go with the foam sealing tape.
Source: Caravan World Sep 2011.


