
DIY solar on a budget
MYSTERY SURROUNDS SOLAR installation and it’s easy to see why. It would appear as though you need a physics degree and a masters in automotive electronics to adequately fit a solar system to your rig. You don’t want a photovoltaic cell to cross pollinate with a UNC anodised hex-head fixing, with the resultant loss of fluid.
That is nonsense, of course, but the point is that a bit of common sense, patience and background reading on power requirements when free camping is all you need. Put away that electrical engineering course application – you won’t need it!
The basic parts you will need are several metres of insulated copper wire (we’ve used 4mm here), self-tapping screws, silicon, brackets for the panel and the key parts of the solar system – a solar panel, a regulator and a deep-cycle battery.
The accessories that you run off the battery are not dealt with here – this is all about harnessing the free power of the sun.
Don’t be tempted to go cheap on this stuff – sure, you can get an excellent 20W panel, a battery and regulator for less than $300. But that marvellous setup would only power your pocket LED torch for half an hour’s reading in your camp swag every night.
Instead, we’re assuming you are not in a swag under the stars but in a caravan with lights, television and 12V points for the likes of recharging a phone. To make a solar conversion worth the effort, you will need a minimum of a 120W panel, 120Ah battery and a decent regulator – this is the best setup for those on a budget. You won’t see much change out of $800 and buying better known brands can blow the budget out to $1000-plus.
As with all caravan DIY and maintenance projects, if you aren’t completely confident with the job at hand, please consult a specialist.
STEP BY STEP
1 Fit brackets to your solar panel for installation on your caravan’s roof.
2 Position panel on roof with brackets attached, permitting adequate ventilation under the panel.
3 Prep roof with wax and grease remover prior to applying your silicon adhesive.
4 Preliminarily position the panel so you know where to clean. Try to position it clear of existing joins as the panel must come off to fix leaks in the join if they should occur.
5 Apply a bead of silicon to help secure the panel to the roof.
6 Gently rest the panel on the bead of silicon.
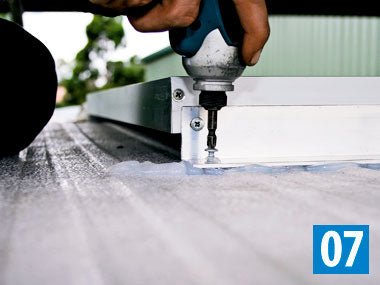
7 Screw the panel into position using self-tapping screws.
8 Drill a hole and feed the wiring from the panel into the internal cupboard you’ve chosen as the new home for the regulator. If your van hasn’t been prewired for solar, it will probably be necessary to drill a hole or holes (which will need to be later sealed) in the roof to facilitate feeding the wiring.
9 Cut excess wire to suit.
10 Connect the wires from the panel to the regulator, making sure the positive and negatives correspond, and screw the regulator to the wall, into a stud or cross member.
11 Position battery box, and feed the ‘out’ wires from the regulator into the boot in preparation for battery fitment. Again, if your van hasn’t been prewired for solar, it may be necessary to drill holes to facilitate wire feed.
12 With your 120Ah battery in position, connect the wires to the appropriate battery posts (pos/neg), fit battery box cover and secure.
13 Regulator fitted with wire feeds from the solar panel and into the battery, with the digital readout showing 12V. The job is done!
Source: Caravan World Apr 2011.


