
DIY: FIT A STEREO SYSTEM
It may seem a little sacrilegious to install a modern stereo to our beloved vintage van, but travellers love their music. We certainly didn’t want to take away from her retro feel, so we were very discreet about where we placed the stereo and its speakers.
To get Betsy fitted with her new system, we towed her over to the RV Repair Centre in Bayswater, Vic, where Paul Hewat took us through the job.
Installing a new stereo is actually a fairly straightforward DIY project well within the wheelhouse of the average backyard caravan mechanic.
You’ll need an electric drill, jigsaw (or hole saw), 12V cabling, and the new stereo.
Given Betsy’s age, she runs solely on 240V mains power, so we also installed a separate 40A DC power supply. However, this isn’t necessary if your van uses 12V battery power, which most modern vans do.
The drill and saw are available from a hardware store (if you don’t have them already), while cables and power supplies can be found at places such as Jaycar and Alltronics.
Fusion Electronics provided an MS-FR602 entertainment system (FM/AM/iPod/CD/amp) with 6in speakers. These marine-tested speakers feature a large woofer cone and titanium dome tweeter for hi-fi quality sound.
It’s also important to note that since you’ll be working with electricity, it’s best to err on the side of caution and consult a licensed electrician in moments of doubt or uncertainty.
STEP BY STEP
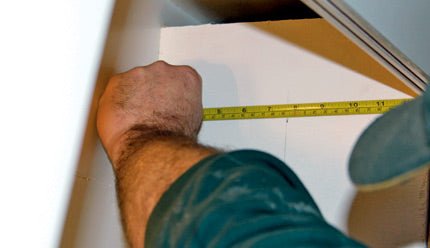
1 Find the right spot for the stereo and measure for the hole according to the unit’s dimensions. Be as accurate as possible, while allowing a small amount of space around the stereo as a margin for error.
2 Once measured, drill a hole in each corner of the clearly marked space. This is to make it easier to see exactly where to begin and end cutting.
3 Using the jigsaw, cut the space from (drilled) hole to hole. Make sure all corners are square and the stereo fits the space.
4 Drill holes in the wall according to the size of the screws supplied with the stereo unit. Make the holes slightly larger than the screws to make sure they can move (if necessary) to line up. Before drilling, a good tip is to mark the holes and remove the stereo to ensure accuracy (inset).
5 Drill screws in to secure stereo, making sure the screws have back plates on the other side of the wall. (You may need another person to hold the back plates in place.)
6 Position and secure the power supply/inverter. This can be anywhere around the stereo, as long as it has at least a small amount of air flow and is close to a powerpoint. If a new powerpoint has to be installed, get a licensed electrician in for the job.
7 Using a 12V cable, connect the power supply to the back of the stereo. If possible, it is a good idea to blank off any wires that aren’t being used so they don’t short out (right).
8 Find a spot and measure holes for the speakers before cutting the space with a hole saw (or jigsaw). Here Paul has used a backing board because Betsy’s original ply is too thin and may break (inset).
9 Run wiring from the speakers back to the stereo, making sure you are following the correct polarity (negative to negative; positive to positive). Consult speaker instruction if you are not sure. Try to keep all leads unobtrusive and out of the way.
10 Fit and screw the speakers in place. Determine where the aerial needs to go and drill a small hole from the inside of the van (turn off power and be aware of wiring). Using the small hole as a guide, drill large hole from outside and run the cabling through.
11 Screw base to cladding and seal with silicone, then screw the aerial to the base and connect wiring to the stereo on the inside. (Use stainless steel screws rather than those provided with the aerial.)
12 Plug power supply to the powerpoint and tidy up any loose wiring and cables behind the unit.
Special thanks to Fusion Electronics for supplying the stereo and power supply for this installation.
WORDS Paul Hayes PICS Kevin Poulter
Source: Caravan World Nov 2011


