
DIY external speakers
Caravan external speakers are a melodic prerequisite for travellers who yearn for a ‘dulcet tone’ fix, once settled in at their desired destination.
Let’s face it, there’s nothing more soothing than harmony while holidaying out on the road — in more ways than one! Tuning into your favourite travel playlist is a surefire way of beating boredom and getting the party going (well, not quite on the dancefloor) on your next vacation.
Perhaps Cliff Richard’s Wired for Sound blaring through the external speakers is your music genre. Do I hear, “I like small speakers, I like tall speakers”? Anyway, “now it’s music I’ve found” — if you’ll excuse the pun.
And Along the Road to Gundagai will never lose its appeal for ‘golden oldies’, such as yours truly, who would actually like to stumble across that “track winding back to an old-fashioned shack”. Yes, Life is a Highway —even if you don’t want to ride it all night long.
So the next time you head to Where the Streets Have No Name, make sure you have external speakers fitted to your van.
Well, now even I’m inspired … in the lyrics of Willie Nelson, “I can’t wait to get back on the road again”!
NB: These images and step-by-step captions depict the simplicity of this installation of caravan external speakers performed by The RV Repair Centre foreman, Paul Hewat, in Bayswater (Vic).
STEP 1
A selection of tools in readiness for the job. Note: The hole saw size is determined by the template provided with installation instruction. Always refer to the instructions prior to installation.
STEP 2
The instructions within the speaker kit will confirm the wire size if extensions are required. The use of protective tube as shown within this image is recommended.
STEP 3
Determine the best position to install the external speakers. Select an area on the external wall that you can also gain access to from the interior.
Handy hint:
Place the speakers above the ‘splash line’ or above the checkerplate should this be fitted on the entry door side. Handy hint 2: Prior to cutting the hole, disconnect the 240V and 12V power within the RV. Measure off or use the template provided to accurately cut the desired whole size.
STEP 4
Using the correct size hole, saw cut the hole. Note: RVs may have solid veneer, foam core or hollow side walls.
STEP 5
Determine the length of the wire required to join the external speakers to either the radio head unit already installed within the RV. Note: Pending the position of the head unit within the RV, the wires may need to run under the RV’s chassis/floor, then by drilling an access hole (under the floor) bring the wires up and into a cupboard that eventually finds its way to the head unit wiring harness.
Handy hint:
Remove the radio head unit to visualise the direction of the wiring harness and join the wires (positive and negative) to the spare speaker wires.
STEP 6
Use side cutters or wire stripper to remove the speaker wire insulation from the actual wire in readiness for the connectors.
STEP 7
Prepare the external speaker for mounting by placing a waterproof membrane tape around the mounting flange as shown.
Handy hint:
The tape is essential if mounting the speaker to an aluminium-cladded RV to absorb the ridge profile.
STEP 8
Place a film of silastic around the mounting surface as shown.
STEP 9
Connect the wires to the correct (positive/negative) terminals on the speaker in readiness for mounting the speaker to the RV.
STEP 10
Place the protective cover over the speaker and then against the side wall in readiness for the screws.
Handy hint:
Some speaker brands may have an emblem on the cover so be sure to place this on the correct angle prior to installing the screws.
STEP 11
Secure the speaker to the wall using the screws provided.
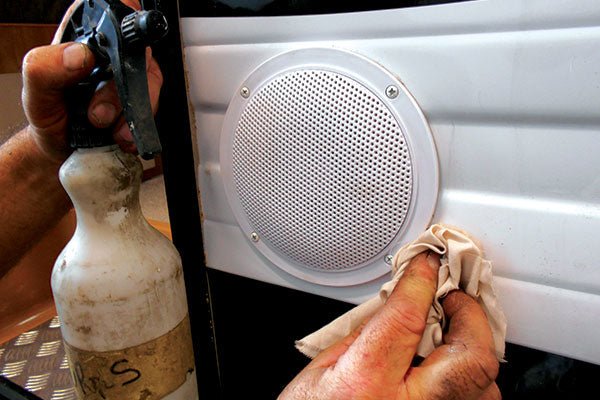
STEP 12
Wipe off silastic with a clean rag and turps.
STEP 13
Depending on the brand of RV and location of the radio head unit and wiring harness, it is possible to remove the external fridge vents and run the speaker wires up and into the cavity, as shown here.
STEP 14
Remove the radio head unit from the RV’s entertainment panel to gain access to the harness behind. Note: Most modern radio head units have a minimum of four speaker wires that allow individual fade settings so interior speakers can be off whilst the external speakers are blasting out your favourite Bob Dylan number or was that, “The King”!
And finally … Once all wires and speakers are in place, reconnect the 240V and 12V power and check that your DIY project is operating successfully.
Handy hint
Ensure all wires under the RV are secured and any access hole(s) drilled are sealed with a plug or silastic. Use protective wire insulation (spaghetti tubing) to all external exposed wires and the interior wiring where chaffing is likely.


