DIY budget body work

NO ONE LIKES their van to get damaged, but it’s an unfortunate fact of RV life. When it comes to the bump and grind of caravanning, those mistakes can be expensive, with dent removal experts often charging up to $100 per dent. And they charge much more to replace sheets, the most common way to fix the problem. So how can you correct a minor mishap yourself at minimal expense?
We wanted to see if a novice could fix a creased caravan for less than $50. Late night television and the internet are full of advertisements spruiking all sorts of miracle wonder cures, but are the simple, easy and cheap dent removal tools – used by even the least technically-minded operator – any good at all?
Major caravan panel damage repair is not for the amateur. It requires immense skill and patience to properly repair a caravan. Realistically, you will not mend damage to aluminium sheeting without years of experience and a whole lot more than $50.
The objective here was not to make a battered van look new again within five minutes. That’s only possible on late night television.
The test subject was our 1979 Viscount Grand Tourer. With more hits than Elvis, this van was a prime candidate for some body sculpting. Hail dents and a few scrapes along the sides would serve us well for this test.
We tried three different do-it-yourself methods of dent repair, all of which assume you can’t get behind the panel to repair it. These repairs have to be tackled from the outside of the caravan only.
GAS FLAME
The first method was to apply heat to the panel with a blow torch, followed by a cold liquid. The next was a bespoke dent pulling kit, using hot glue stuck to a plastic pad. The final method was to insert a screw into the dent and use a pair of pliers to pull out the dent (and then remove the screw and patch the hole in preparation for a later application of body filler).
The gas flame applied at a distance to slowly heat the panel, followed by the application of a wet rag, only popped out a portion of a test dent. Aluminium sheeting will easily melt or blow holes with too much heat, so this process is not really a recommended or particularly satisfactory repair method.
GLUED IN
Next we tried the Pops A Dent repair kit, the cheapest on the market, typically advertised at less than $30. The kit itself is quite basic – a hot glue gun, glue sticks, three threaded plugs and the bridge and knurled nut to attach to each plug to pull out the dent.
According to the Pops A Dent instructions, the theory to dent repair is simple: heat the glue in the gun, apply to the face of the appropriate-size plug and stick to the (cleaned) dent. Wait three minutes and fit the bridge over the thread and tighten with the knurled knob.
The dent is pulled out and the plug either pops off itself or you apply pressure from an angle until it releases. Job done.
The supplied glue gun worked well initially but could not generate adequate heat by the second glue stick, meaning the glue did not adhere properly. Eventually, the gun would not heat the glue at all, so we had to buy a new $15 unit from a craft shop.
With the new gun producing steaming hot glue (and us wearing gloves to avoid getting burned) the plugs adhered to the aluminium much better. However, the van’s chalky old enamel was not a good fixing surface; the solution was to lightly sand it back.
This method is really quite simple, but it doesn’t fix all dents and doesn’t do a perfect job. On sharper divots, such as from hail damage, the Pops A Dent can’t get the pulling force needed to restore the stretched aluminium sheeting, and even less acute dents will remain slightly creased. As the pictures show, the large dents do pull out, but not completely. Slightly caved-in sections on large panels fare the best with this repair method.
A variation is to use a hot glue gun and a plastic cap such as those fitted to aerosol cans. Drill half a dozen or so small holes in the cap (to allow the glue to seep through and provide better adhesion), apply the hot glue and let it set on the dent as per the above method. When pulling the cap off the van, it is easy enough to get purchase with your hands and ease the cap off and the dent out.
But as we discovered, large dents are best pulled out with a screw and a pair of pliers. You’ll need a small quantity of sealant, such as Sikaflex. A tube of sealant, a pair of pliers and a screw and screwdriver (assuming you don’t have this equipment already) can easily be purchased for less than $50.
GET WHAT YOU PAY FOR
Of course, there are superior (usually professional) methods for repairing your caravan, but none are as cheap or as simple.
However, with the right amounts of body filler, sanding and painting – not to mention a little patience – your van can look close to new again for a minimal financial outlay.
STEP BY STEP
01 We used a wax and grease remover to clean our van and the Pops A Dent plug
02 Next, we applied the plug to the dent we wanted to repair
03 This dent proved too stretched for the Pops A Dent, so we opted for the 'screw method'
04 Using a screw and a pair of pliers, we were largely able to restore the original shape
05 e then used Sikaflex to waterproof the repair
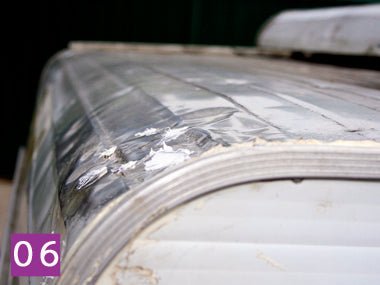
06 It's not perfect but, for less than $50, it's not bad — some filler and paint would finish it


